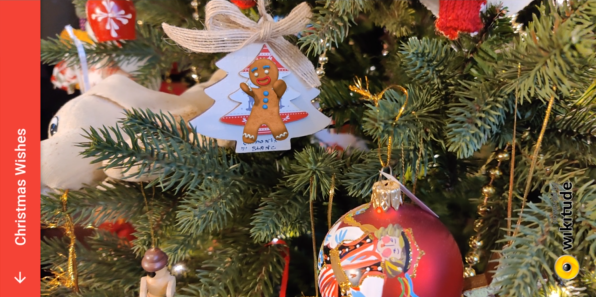
# Object Tracking and GIF Animation
- In the previous section we've seen how you can add some simple animation to your AR experience. We've done this by changing different 3D properties of our models.
- Now we will try to add real animated movements. Therefore we will use an animated gif. That's not really 3D, but animated gifs can be find easily everywhere on the Internet and are very easy to use in an AR experience. And you can hardly see the difference.
- Instead of Image Tracking, we will use Object Tracking in this AR experience.
- The result will be a really cool Christmas tree with moving figures
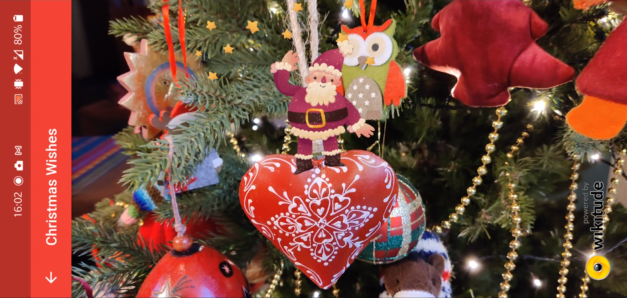
- Have a look at our facebook page to see our Christmas tree coming to life
# Creating a Flutter/Wikitude App
- First you need a Flutter application in which you have done all the necessary steps to work with Wikitude.
MORE DETAIL
All steps are explained in more detail in the Get started section. You can find more information there.
# Create the Flutter App
- Create a new Flutter app named christmastree_app
- Create the folders
pagesandwidgets - Delete
widget_test.dart - Copy the Wikitude SDK (
pluginfolder) and add the Wikitude plugin to the dependencies - Change the APP ID to
be.thomasmore.ar - Change the
minSdkVersionto 23 and thetargetSdkVersionto 30 - Add the right entries to the manifest file
# Add the pages and widget
- Replace the content of
main.dartwith
import 'package:flutter/material.dart';
import './pages/home.dart';
void main() {
runApp(const ChristmasTreeApp());
}
class ChristmasTreeApp extends StatelessWidget {
const ChristmasTreeApp({Key? key}) : super(key: key);
// This widget is the root of your application.
Widget build(BuildContext context) {
return MaterialApp(
debugShowCheckedModeBanner: false,
title: 'Christmas Wishes',
theme: ThemeData(
primarySwatch: Colors.red,
visualDensity: VisualDensity.adaptivePlatformDensity,
),
home: const HomePage(),
);
}
}
1
2
3
4
5
6
7
8
9
10
11
12
13
14
15
16
17
18
19
20
21
22
23
24
2
3
4
5
6
7
8
9
10
11
12
13
14
15
16
17
18
19
20
21
22
23
24
- Create a folder
assetsin the root folder of you app. - Download this image of a christmas tree and copy it into the
assetsfolder. - Update your
pubspec.yamlwith the following asset:
# The following section is specific to Flutter.
flutter:

  # The following line ensures that the Material Icons font is
  # included with your application, so that you can use the icons in
  # the material Icons class.
  uses-material-design: true

  assets:
    - assets/tree.png
1
2
3
4
5
6
7
8
9
10
2
3
4
5
6
7
8
9
10
- Create the page
home.dart(in thepagesfolder) with following code
import 'package:flutter/material.dart';
import 'wikitude.dart';
import 'package:augmented_reality_plugin_wikitude/wikitude_plugin.dart';
import 'package:augmented_reality_plugin_wikitude/wikitude_response.dart';
class HomePage extends StatefulWidget {
const HomePage({Key? key}) : super(key: key);
_HomePageState createState() => _HomePageState();
}
class _HomePageState extends State<HomePage> {
List<String> features = ["image_tracking"];
Widget build(BuildContext context) {
AssetImage asset = const AssetImage('assets/tree.png');
Image image = Image(image: asset, width: 362.0, height: 551.0);
return Scaffold(
appBar: AppBar(
title: const Text("Christmas Wishes"),
),
body: Container(
color: Colors.white,
child: Center(
child: GestureDetector(
onTap: () {
navigateToWikitude();
},
child: Container(
child: image,
padding: const EdgeInsets.only(top: 0.0),
),
),
),
),
);
}
void navigateToWikitude() {
checkDeviceCompatibility().then((value) => {
if (value.success)
{
requestARPermissions().then((value) => {
if (value.success)
{
Navigator.push(
context,
MaterialPageRoute(
builder: (context) => const WikitudePage()),
)
}
else
{
debugPrint("AR permissions denied"),
debugPrint(value.message)
}
})
}
else
{debugPrint("Device incompatible"), debugPrint(value.message)}
});
}
Future<WikitudeResponse> checkDeviceCompatibility() async {
return await WikitudePlugin.isDeviceSupporting(features);
}
Future<WikitudeResponse> requestARPermissions() async {
return await WikitudePlugin.requestARPermissions(features);
}
}
1
2
3
4
5
6
7
8
9
10
11
12
13
14
15
16
17
18
19
20
21
22
23
24
25
26
27
28
29
30
31
32
33
34
35
36
37
38
39
40
41
42
43
44
45
46
47
48
49
50
51
52
53
54
55
56
57
58
59
60
61
62
63
64
65
66
67
68
69
70
71
72
73
74
75
2
3
4
5
6
7
8
9
10
11
12
13
14
15
16
17
18
19
20
21
22
23
24
25
26
27
28
29
30
31
32
33
34
35
36
37
38
39
40
41
42
43
44
45
46
47
48
49
50
51
52
53
54
55
56
57
58
59
60
61
62
63
64
65
66
67
68
69
70
71
72
73
74
75
- Create the page
wikitude.dart(in thepagesfolder) with following code
import 'package:flutter/material.dart';
import '../widgets/arworld.dart';
class WikitudePage extends StatefulWidget {
const WikitudePage({Key? key}) : super(key: key);
_WikitudePageState createState() => _WikitudePageState();
}
class _WikitudePageState extends State<WikitudePage> {
Widget build(BuildContext context) {
return Scaffold(
appBar: AppBar(
title: const Text("Christmas Wishes"),
),
body: const Center(
// Here we load the Widget with the Christmas Tree experience
child: ARWorldWidget()),
);
}
}
1
2
3
4
5
6
7
8
9
10
11
12
13
14
15
16
17
18
19
20
21
22
23
2
3
4
5
6
7
8
9
10
11
12
13
14
15
16
17
18
19
20
21
22
23
- Create the widget
arworld.dart(in thewidgetsfolder) with following code
import 'package:augmented_reality_plugin_wikitude/architect_widget.dart';
import 'package:augmented_reality_plugin_wikitude/startupConfiguration.dart';
import 'package:flutter/material.dart';
class ARWorldWidget extends StatefulWidget {
const ARWorldWidget ({Key? key}) : super(key: key);
_ARWorldWidgetState createState() =>
_ARWorldWidgetState();
}
class _ARWorldWidgetState extends State<ARWorldWidget>
with WidgetsBindingObserver {
late ArchitectWidget architectWidget;
String wikitudeTrialLicenseKey =
"Replace with the Wikitude EDU License Key from Canvas";
StartupConfiguration startupConfiguration = StartupConfiguration(
cameraPosition: CameraPosition.BACK,
cameraResolution: CameraResolution.AUTO);
List<String> features = ["image_tracking"];
void initState() {
super.initState();
WidgetsBinding.instance?.addObserver(this);
architectWidget = ArchitectWidget(
onArchitectWidgetCreated: onArchitectWidgetCreated,
licenseKey: wikitudeTrialLicenseKey,
startupConfiguration: startupConfiguration,
features: features,
);
}
Widget build(BuildContext context) {
return Container(
decoration: const BoxDecoration(color: Colors.black),
child: architectWidget, //ar widget
);
}
void didChangeAppLifecycleState(AppLifecycleState state) {
switch (state) {
case AppLifecycleState.paused:
architectWidget.pause();
break;
case AppLifecycleState.resumed:
architectWidget.resume();
break;
default:
}
}
void dispose() {
architectWidget.pause();
architectWidget.destroy();
WidgetsBinding.instance?.removeObserver(this);
super.dispose();
}
Future<void> onArchitectWidgetCreated() async {
architectWidget.load(
"wikitude_object_tracking/index.html",
onLoadSuccess,
onLoadFailed);
architectWidget.resume();
}
Future<void> onLoadSuccess() async {
debugPrint("Successfully loaded Architect World");
}
Future<void> onLoadFailed(String error) async {
debugPrint("Failed to load Architect World");
debugPrint(error);
}
}
1
2
3
4
5
6
7
8
9
10
11
12
13
14
15
16
17
18
19
20
21
22
23
24
25
26
27
28
29
30
31
32
33
34
35
36
37
38
39
40
41
42
43
44
45
46
47
48
49
50
51
52
53
54
55
56
57
58
59
60
61
62
63
64
65
66
67
68
69
70
71
72
73
74
75
76
77
78
79
80
81
82
83
2
3
4
5
6
7
8
9
10
11
12
13
14
15
16
17
18
19
20
21
22
23
24
25
26
27
28
29
30
31
32
33
34
35
36
37
38
39
40
41
42
43
44
45
46
47
48
49
50
51
52
53
54
55
56
57
58
59
60
61
62
63
64
65
66
67
68
69
70
71
72
73
74
75
76
77
78
79
80
81
82
83
Wikitude EDU License key
- Do not forget to insert the license key from Canvas in the code above!
# Add the HTML & JS code
- Download the Object Tracking Wikitude code
- Extract the archive and copy the
wikitude_object_trackingfolder into the root folder of your Chirstmas Wishes App - Update your
pubspec.yamlwith the following assets:
# The following section is specific to Flutter.
flutter:

  # The following line ensures that the Material Icons font is
  # included with your application, so that you can use the icons in
  # the material Icons class.
  uses-material-design: true

  assets:
    - assets/tree.png
    - wikitude_object_tracking/
    - wikitude_object_tracking/js/
    - wikitude_object_tracking/css/
    - wikitude_object_tracking/assets/
1
2
3
4
5
6
7
8
9
10
11
12
13
14
2
3
4
5
6
7
8
9
10
11
12
13
14
# Gradle version
- Change the Gradle version to a lower one (3.6.0) in the
android\build.gradlefile - Remove the
abiFiltersin theandroid\app\build.gradlefile (if it's there)
# Run the App
- Run the App. You should see your Chistmas tree. Nothing to get really excited about at first sight, but you have an already app that is ready for the most amazing AR experience with Object Tracking.

# Object Tracking
- In order to do Object Tracking, you need to create a Wikitude Object Target Collection. This is a file with extension .wto that contains all the objects you can scan with the App for AR purposes (the same as a .wtc file for Image Tracking).
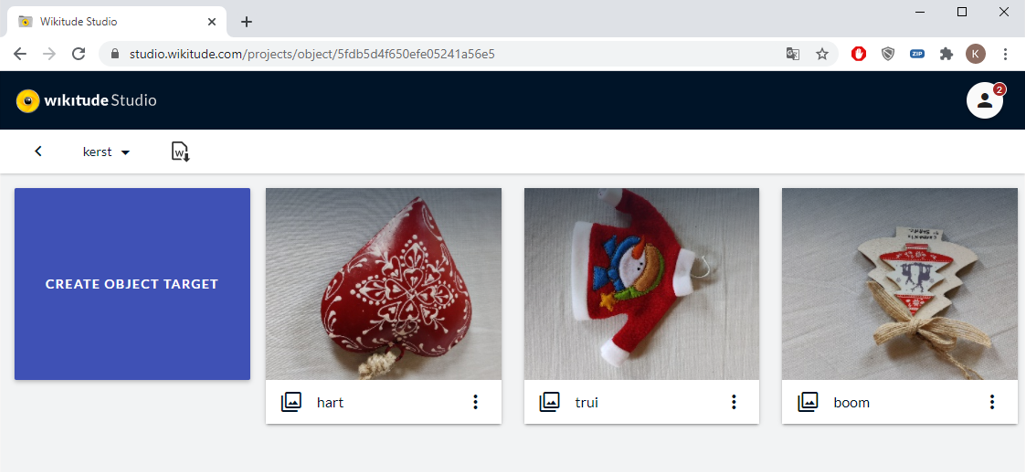
- First, choose a few objects that you want your app to recognise. We took three Christmas figures from our Christmas tree. Put the objects one by one on a large sheet and take about 15 photos of each with your smartphone (different distances and viewpoints). We had to try a few times, because not every Christmas figure was recognised equally well later on.
- Then use Wikitude studio to create a Wikitude Object Target Collection (.wto file) using those pictures.
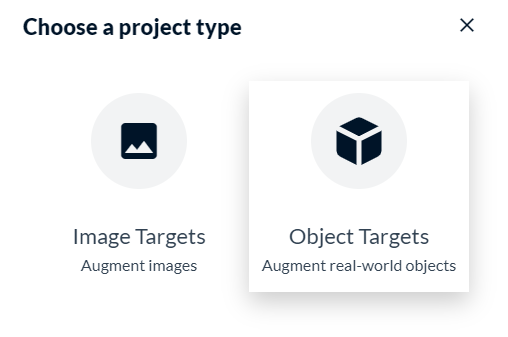
- Start Wikitude Studio, sign in with Google (or create an account) and create a new project of type Object Targets:
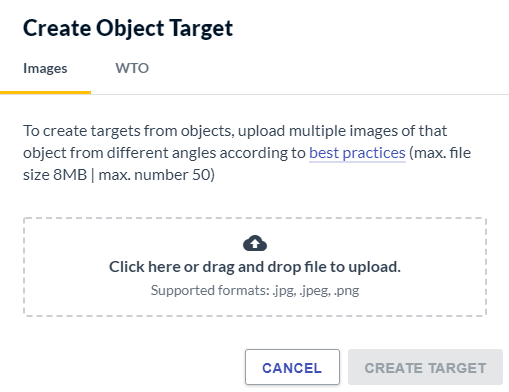
- Create as many Object Targets as objects and upload the photos for each of them:
- When finished
export the .wto file, name it christmas.wto and place it in the wikitude_object_tracking/assets folder of your application.
- Please note the names of the three target objects (
hart,truiandboom). We'll use them later on in our JavaScript code.
EXTRA USEFUL INFORMATION
- Best practices for Object Targets
- How to create a
.wtofile (scroll to Object Targets).
# Sprite sheet
- A sprite sheet (or sprite strip) is a single image file containing multiple other images, namely animation frames. Sprite sheets are often used in game development and AR experiences. Since a sprite sheet contains multiple frames of the same figure, you can easily animate the figure by showing the frames one after the other (like in a cartoon):
![]()
- The easiest way to create such a sprite is to look for an animated gif on the internet. Take one with a transparent background, this gives the most realistic result. The animated gid must then be converted to a sprite sheet which is possible with this online tool.
- The result is one large image containing the frames of the animated gif. These frames will later be played from left to right, top to bottom. Calculate the height and width of each frame and make sure you know how many frames there are in total. You will need this information in a moment.
- Save the sprite sheet (
gingy.pngin our case) in thewikitude_object_tracking/assetsfolder.
GINGY
- In case you would like to know, Gingy is the brownish gingerbread cookie ("Peperkoekenmannetje") of a little man with white eyes, hands, light blue eyebrows, a red mouth and purple gumdrop buttons (which is our favourite part of him). He is a supporting character in the Shrek series.
# Putting it all together
- Open the file
object_tracking.jsin thewikitude_object_trackingfolder and code thecreateOverlaysfunction. - We have added some comments to explain things a bit.
- We've included only the
Gingyanimation whenboomis recognized. Repeat this step if you've got multiple target objects.
    createOverlays: function createOverlaysFn() {
        // Use christmas.wto to recognize the chirstmas figures
        this.targetCollectionResource = new AR.TargetCollectionResource("assets/christmas.wto", {
            onError: World.onError
        });

        // Three figures to recognize max (in this case)
        this.tracker = new AR.ObjectTracker(this.targetCollectionResource, {
            maximumNumberOfConcurrentlyTrackableTargets: 3,
            onError: World.onError
        });

        // ** Gingy Animation ** //
        // ********************* //
        // Read the sprite sheet
        var imgGingy = new AR.ImageResource("assets/gingy.png", {
            onError: World.onError
        });
        // 0.8 is the height of Gingy, start with 1 and experiment with value until the figure has the right size
        // 500 (width), 500 (height) of one frame
        var overlayGingy = new AR.AnimatedImageDrawable(imgGingy, 0.8, 500, 500, {
            // Use x and y to position the figure on the target object (start with 0,0 and experiment)
            // You may also need to rotate about one of the three axes, but wait and see how the figure appears.
            // If you must rotate, do so before you begin the translation, because rotating the figure also
            // rotates the axes.
            translate: {
                x: 0.05,
                y: 0.5
            }
            /* no rotation needed for Gingy
            ,
            rotate: {
                x: 90,
                z: 170
            }
            */
        });

        // Push the correct number of frames into a frames array
        framesGingy = [];
        for (i = 0; i< 30; i++) {
            framesGingy.push(i);
        }
        // Play those frames, with a pause of 80 (milliseconds?), repeat (-1)
        overlayGingy.animate(framesGingy, 80, -1);

        // Show Gingy when "boom" (name of the target object in the .wto file) is recognized
        this.pageGingy = new AR.ObjectTrackable(this.tracker, "boom", {
            drawables: {
                cam: [overlayGingy]
            },
            onImageRecognized: World.hideInfoBar,
            onError: World.onError
        });

    },
1
2
3
4
5
6
7
8
9
10
11
12
13
14
15
16
17
18
19
20
21
22
23
24
25
26
27
28
29
30
31
32
33
34
35
36
37
38
39
40
41
42
43
44
45
46
47
48
49
50
51
52
53
54
55
56
2
3
4
5
6
7
8
9
10
11
12
13
14
15
16
17
18
19
20
21
22
23
24
25
26
27
28
29
30
31
32
33
34
35
36
37
38
39
40
41
42
43
44
45
46
47
48
49
50
51
52
53
54
55
56
- Run the app and see the target object coming to life. In our case a dancing Gingy on a Christmas tree:
- Maybe you can add a second animated figure to your AR experience.