# Get started
- Find a complete installation guide on the Wikitude website: Get started with Wikitude
# Introduction to the Wikitude SDK
- The Wikitude SDK is a software library and framework for mobile apps used to create augmented reality experiences
- The SDK supports
- location based use cases
- image recognition
- tracking technology
# Architecture
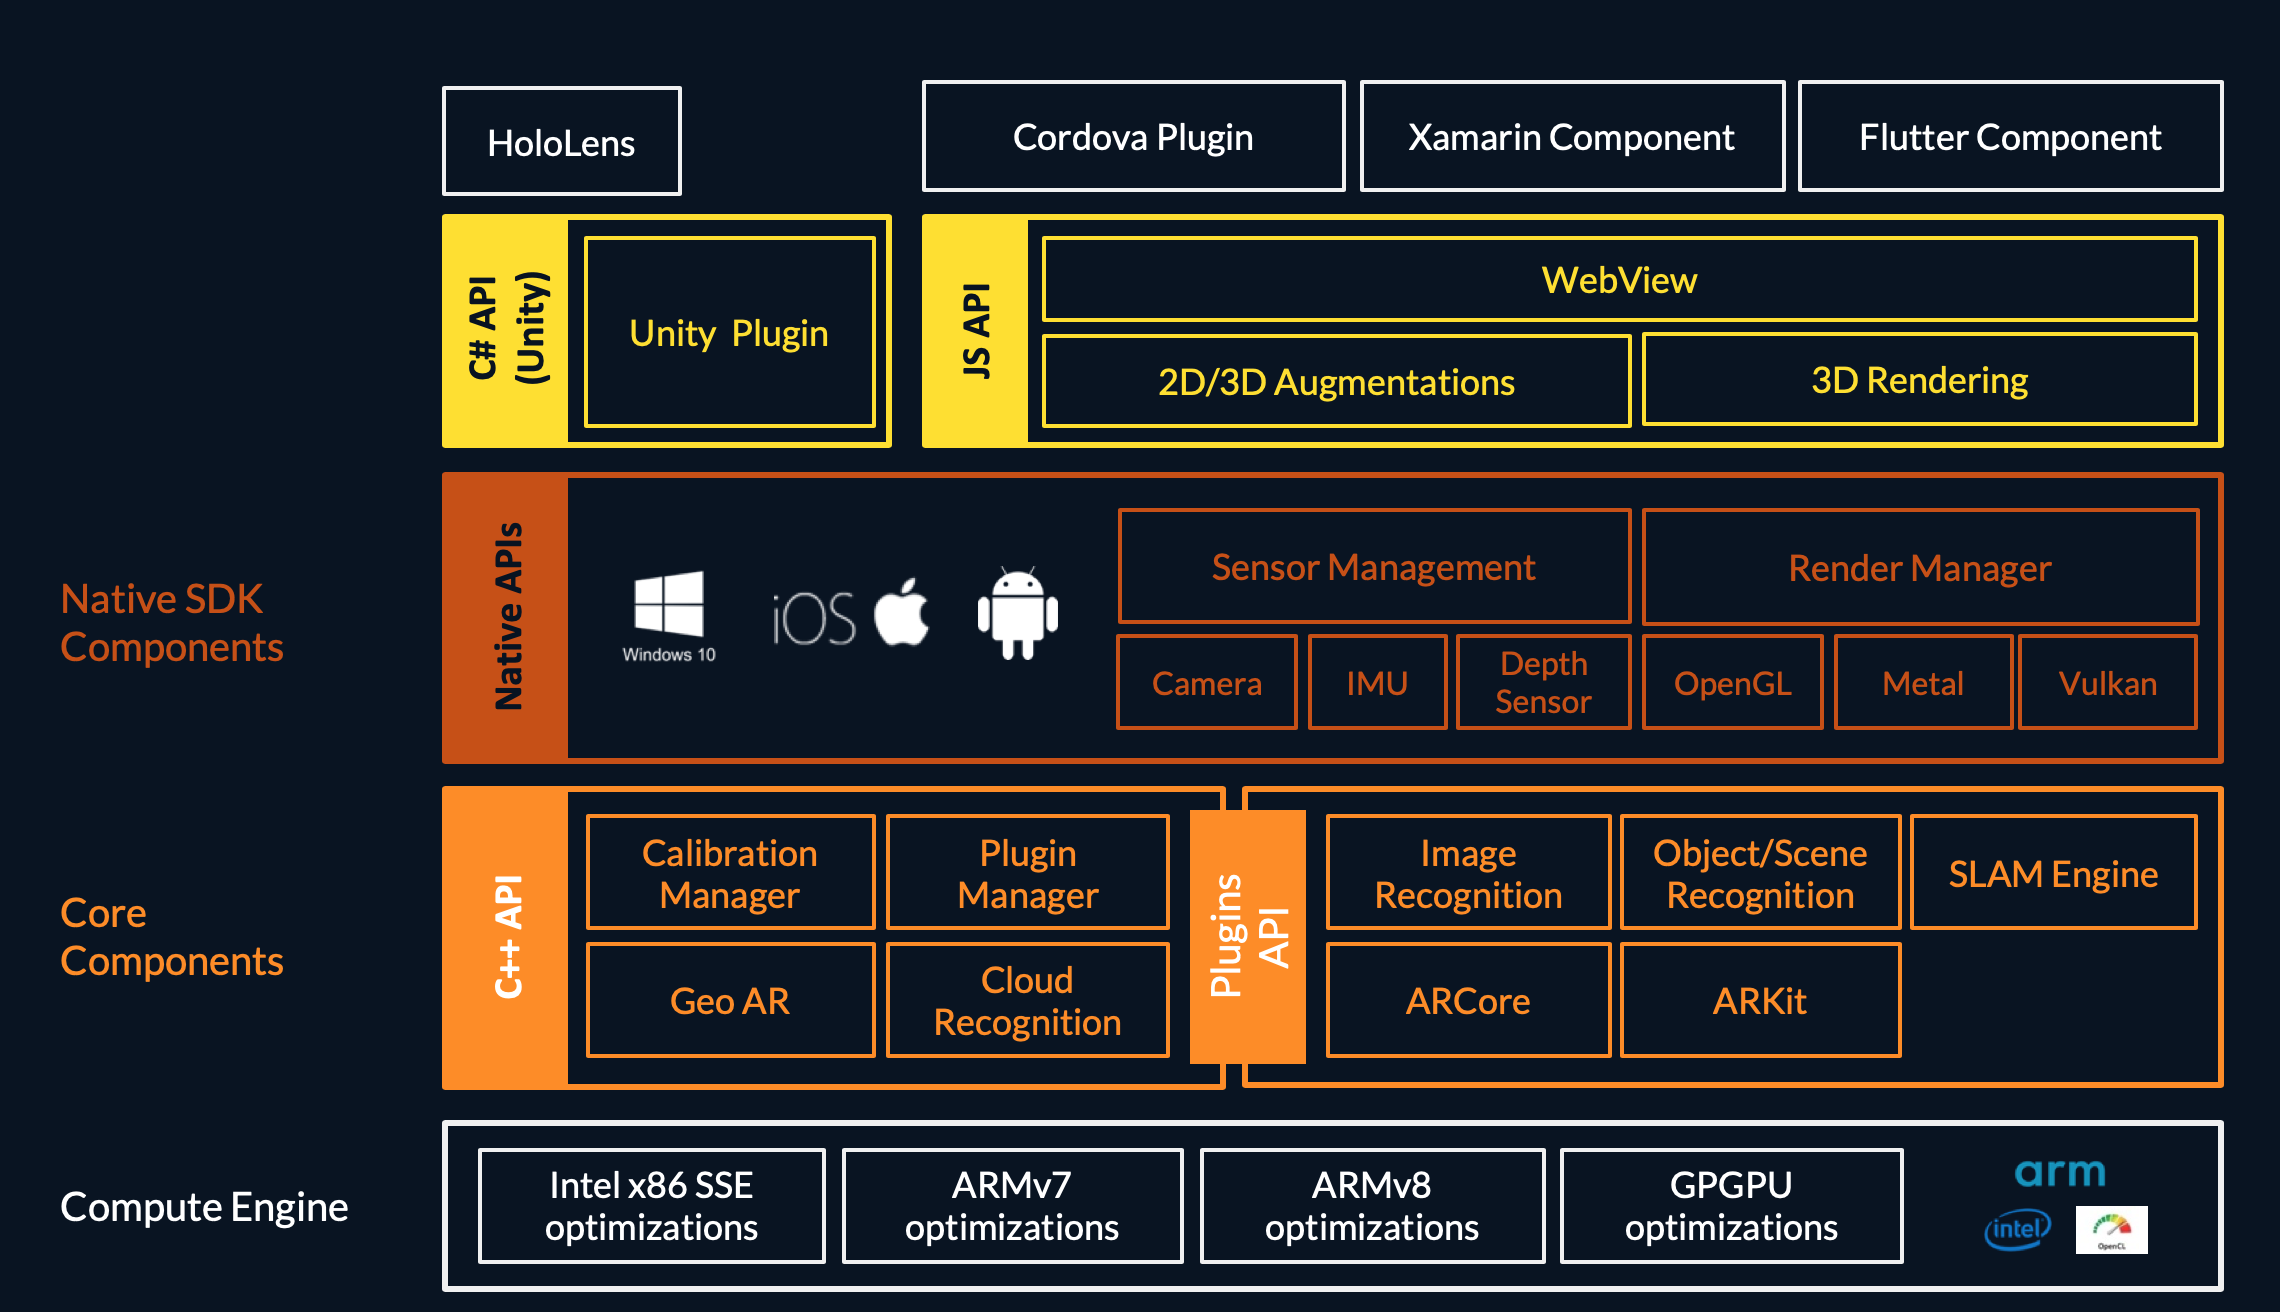
- Computer Vision Engine = core component of Wikitude SDK
- SLAM Engine (Simultaneous Localization and Mapping)
- Technology which understands the physical world through feature points
- Possible to Recognize 3D Objects & Scenes, as well as to Instantly Track the world, and to overlay digital interactive augmentations
- Image Recognition Engine
- Object Recognition
- Only accessible through Native API or JavaScript API
- SLAM Engine (Simultaneous Localization and Mapping)
- JS API = Wikitude API that allows us to use 'mobile device features' that are needed for an AR experience
- HTML and JavaScript
- Vision engine
- Location based AR
- Dedicated rendering functionality
- Flutter Component
- On top of the JavaScript API
- Allows us to use Wikitude SDK together with Flutter
Summary
- We will download the Wikitude Flutter plugin and integrate it into a Flutter app
- The Wikitude Flutter plugin consists of
- The Flutter component
- The JavaScript API
- The Wikitude SDK
# Prerequisites
- Complete Flutter installation
- Download Wikitude SDK Professional Edition for Flutter
- Just download it for now. You will need it later on when we will use this plugin in our Flutter application
- Wikitude EDU License: get it on Canvas!
Wikitude EDU License
- Publishing Apps to the Play Store using this EDU license is absolutely FORBIDDEN! More info later.
# Creating an AR Flutter app with Wikitude
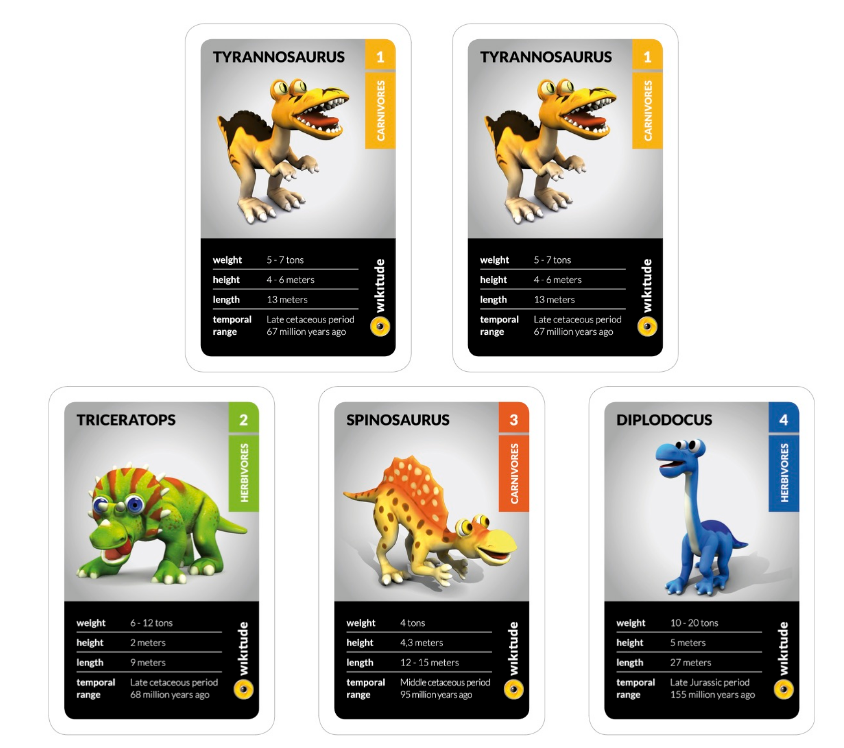
- We will create a Flutter app which allows us to scan multiple targets (= dino cards). When a dino is recognized the corresponding 3D model will be shown on top of the card
- Follow the next steps carefully to create your first AR experience in Flutter.
Versions
- This course is based on Flutter
3.13.3, Dart3.1.1and Android SDK34.0.0
# Create the App
- Create a new Flutter application project (VS Code or Flutter CLI) named my_flutter_ar_app
- Create the following directories in the
libfolder to organize your code:models,pagesandwidgets - Delete
widget_test.dartin thetestfolder - Copy the Wikitude SDK For Flutter (plugin folder) in the root directory of the project:

- Open my_flutter_ar_app/pubspec.yaml and add the Wikitude plugin to the dependencies:
dependencies:
  flutter:
    sdk: flutter


  # The following adds the Cupertino Icons font to your application.
  # Use with the CupertinoIcons class for iOS style icons.
  cupertino_icons: ^1.0.2

  augmented_reality_plugin_wikitude:
    path: ./plugin/augmented_reality_plugin_wikitude/
1
2
3
4
5
6
7
8
9
10
11
2
3
4
5
6
7
8
9
10
11
pubspec.yaml
- Making changes to
pubspec.yamlautomatically results in VS Code executing theflutter packages getcommand - This command can also be executed from a terminal
# Additional steps
- Change the APP ID to
be.thomasmore.ar(in VS Code: Edit|Replace in Files)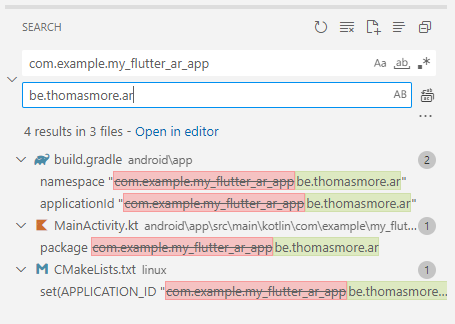
Wikitude EDU License
- Wikitude is not a free product. Therefore we applied for (and received) a Wikitude EDU license. This license is a special offering that allows academics to use Wikitude’s full features set for teaching and learning augmented reality.
- Because of this EDU license we can only build apps with
be.thomasmore.aras APP ID. - Publishing Apps to the Play Store using this EDU license is absolutely FORBIDDEN!
- Open
android\app\build.gradleand change theminSdkVersionto 23 (harcoded, no need to use a flutter global variable)
 defaultConfig {
        applicationId "be.thomasmore.ar"
        minSdkVersion 23
        targetSdkVersion flutter.targetSdkVersion
        versionCode flutterVersionCode.toInteger()
        versionName flutterVersionName
    }
1
2
3
4
5
6
7
2
3
4
5
6
7
- Add the following entries to the
android\app\src\main\AndroidManifest.xml
<manifest xmlns:android="http://schemas.android.com/apk/res/android">

    <uses-permission android:name="android.permission.CAMERA" />
    <uses-permission android:name="android.permission.INTERNET" />
    <uses-permission android:name="android.permission.ACCESS_COARSE_LOCATION" />
    <uses-permission android:name="android.permission.ACCESS_FINE_LOCATION" />
    <uses-permission android:name="android.permission.ACCESS_NETWORK_STATE" />
    <uses-permission android:name="android.permission.ACCESS_WIFI_STATE" />
    <uses-permission android:name="android.permission.WRITE_EXTERNAL_STORAGE" android:maxSdkVersion="28" />

    <uses-feature android:glEsVersion="0x00020000" android:required="true" />
    <uses-feature android:name="android.hardware.camera" android:required="true" />
    <uses-feature android:name="android.hardware.location" android:required="true" />
    <uses-feature android:name="android.hardware.sensor.accelerometer" android:required="true" />
    <uses-feature android:name="android.hardware.sensor.compass" android:required="true" />
    <uses-feature android:name="android.hardware.sensor.gyroscope" android:required="false" />

    <application
        android:name="io.flutter.app.FlutterApplication"
        android:label="my_flutter_ar_app"
        android:icon="@mipmap/ic_launcher">
    ...
1
2
3
4
5
6
7
8
9
10
11
12
13
14
15
16
17
18
19
20
21
22
2
3
4
5
6
7
8
9
10
11
12
13
14
15
16
17
18
19
20
21
22
AndroidManifest.xml
- Camera permission is always required to access the camera to display AR content
- The minimum OpenGLES version required is 2.0
- Location and sensors are required if using geolocation features (optional)
- WRITE_EXTERNAL_STORAGE is required if using the screenshot saving feature only for Android versions lower than 29 (optional)
# Preparing our App
lib\main.dart= starting point applicationMyFlutterArApp
import 'package:flutter/material.dart';
import './pages/home.dart';
void main() {
runApp(const MyFlutterArApp());
}
class MyFlutterArApp extends StatelessWidget {
const MyFlutterArApp({Key? key}) : super(key: key);
// This widget is the root of your application.
Widget build(BuildContext context) {
return MaterialApp(
debugShowCheckedModeBanner: false,
title: 'Flutter Demo',
theme: ThemeData(
primarySwatch: Colors.blue,
visualDensity: VisualDensity.adaptivePlatformDensity,
),
home: const HomePage(),
);
}
}
1
2
3
4
5
6
7
8
9
10
11
12
13
14
15
16
17
18
19
20
21
22
23
24
2
3
4
5
6
7
8
9
10
11
12
13
14
15
16
17
18
19
20
21
22
23
24
lib\pages\home.dart= home page
import 'ardino.dart';
import 'package:flutter/material.dart';
import 'package:augmented_reality_plugin_wikitude/wikitude_plugin.dart';
import 'package:augmented_reality_plugin_wikitude/wikitude_response.dart';
class HomePage extends StatefulWidget {
const HomePage({Key? key}) : super(key: key);
State<StatefulWidget> createState() => _HomePageState();
}
class _HomePageState extends State<HomePage> {
List<String> features = ["image_tracking"];
Widget build(BuildContext context) {
return Scaffold(
appBar: AppBar(
title: const Text("My Flutter AR App"),
),
body: Center(
child: ElevatedButton(
onPressed: navigateToDinos, child: const Text("Scan de dino's!")),
),
);
}
void navigateToDinos() {
debugPrint("Wij gaan naar dino's");
checkDeviceCompatibility().then((value) => {
if (value.success)
{
requestARPermissions().then((value) => {
if (value.success)
{
Navigator.push(
context,
MaterialPageRoute(builder: (context) => const ArDinoPage()),
)
}
else
{
debugPrint("AR permissions denied"),
debugPrint(value.message)
}
})
}
else
{debugPrint("Device incompatible"), debugPrint(value.message)}
});
}
Future<WikitudeResponse> checkDeviceCompatibility() async {
return await WikitudePlugin.isDeviceSupporting(features);
}
Future<WikitudeResponse> requestARPermissions() async {
return await WikitudePlugin.requestARPermissions(features);
}
}
1
2
3
4
5
6
7
8
9
10
11
12
13
14
15
16
17
18
19
20
21
22
23
24
25
26
27
28
29
30
31
32
33
34
35
36
37
38
39
40
41
42
43
44
45
46
47
48
49
50
51
52
53
54
55
56
57
58
59
60
61
62
2
3
4
5
6
7
8
9
10
11
12
13
14
15
16
17
18
19
20
21
22
23
24
25
26
27
28
29
30
31
32
33
34
35
36
37
38
39
40
41
42
43
44
45
46
47
48
49
50
51
52
53
54
55
56
57
58
59
60
61
62
| info |
|---|
The HomePage has a centered button (ElevatedButton) |
Clicking this button navigates to the ArDinoPage |
navigateToDinos() is the method that handles the navigation. In this method we are checking if the device is compatible and we request AR permissions. We do this for the image_tracking feature. Only if both checks are ok we navigate further to the ArDinoPage |
lib\pages\ardino.dart= AR page for scanning dino's- In the
childpoperty of thebodywe will call the AR Widget
import 'package:flutter/material.dart';
import '../widgets/armultipletargets.dart';
class ArDinoPage extends StatefulWidget {
const ArDinoPage({Key? key}) : super(key: key);
State<StatefulWidget> createState() => _ArDinoPageState();
}
class _ArDinoPageState extends State<ArDinoPage> {
Widget build(BuildContext context) {
return Scaffold(
appBar: AppBar(
title: const Text("Dino's"),
),
body: const Center(
// Here we load the Widget with the AR Dino experience
child: ArMultipleTargetsWidget()),
);
}
}
1
2
3
4
5
6
7
8
9
10
11
12
13
14
15
16
17
18
19
20
21
22
23
2
3
4
5
6
7
8
9
10
11
12
13
14
15
16
17
18
19
20
21
22
23
lib\widgets\armultipletargets.dart= AR widget where theArchitectWidgetfrom the Wikitude SDK is used for creating an AR experience
import 'package:augmented_reality_plugin_wikitude/architect_widget.dart';
import 'package:augmented_reality_plugin_wikitude/startupConfiguration.dart';
import 'package:flutter/material.dart';
class ArMultipleTargetsWidget extends StatefulWidget {
const ArMultipleTargetsWidget({Key? key}) : super(key: key);
State<StatefulWidget> createState() =>
_ArMultipleTargetsWidgetState();
}
class _ArMultipleTargetsWidgetState extends State<ArMultipleTargetsWidget>
with WidgetsBindingObserver {
late ArchitectWidget architectWidget;
String wikitudeTrialLicenseKey =
"Replace with the Wikitude EDU License Key from Canvas";
StartupConfiguration startupConfiguration = StartupConfiguration(
cameraPosition: CameraPosition.BACK,
cameraResolution: CameraResolution.AUTO);
List<String> features = ["image_tracking"];
void initState() {
super.initState();
WidgetsBinding.instance.addObserver(this);
architectWidget = ArchitectWidget(
onArchitectWidgetCreated: onArchitectWidgetCreated,
licenseKey: wikitudeTrialLicenseKey,
startupConfiguration: startupConfiguration,
features: features,
);
}
Widget build(BuildContext context) {
return Container(
decoration: const BoxDecoration(color: Colors.black),
child: architectWidget, //ar widget
);
}
void didChangeAppLifecycleState(AppLifecycleState state) {
switch (state) {
case AppLifecycleState.paused:
architectWidget.pause();
break;
case AppLifecycleState.resumed:
architectWidget.resume();
break;
default:
}
}
void dispose() {
architectWidget.pause();
architectWidget.destroy();
WidgetsBinding.instance.removeObserver(this);
super.dispose();
}
Future<void> onArchitectWidgetCreated() async {
architectWidget.load(
"samples/03_MultipleTargets_1_MultipleTargets/index.html",
onLoadSuccess,
onLoadFailed);
architectWidget.resume();
}
Future<void> onLoadSuccess() async {
debugPrint("Successfully loaded Architect World");
}
Future<void> onLoadFailed(String error) async {
debugPrint("Failed to load Architect World");
debugPrint(error);
}
}
1
2
3
4
5
6
7
8
9
10
11
12
13
14
15
16
17
18
19
20
21
22
23
24
25
26
27
28
29
30
31
32
33
34
35
36
37
38
39
40
41
42
43
44
45
46
47
48
49
50
51
52
53
54
55
56
57
58
59
60
61
62
63
64
65
66
67
68
69
70
71
72
73
74
75
76
77
78
79
80
81
82
83
2
3
4
5
6
7
8
9
10
11
12
13
14
15
16
17
18
19
20
21
22
23
24
25
26
27
28
29
30
31
32
33
34
35
36
37
38
39
40
41
42
43
44
45
46
47
48
49
50
51
52
53
54
55
56
57
58
59
60
61
62
63
64
65
66
67
68
69
70
71
72
73
74
75
76
77
78
79
80
81
82
83
| code | description |
|---|---|
ArchitectWidget | The widget from the Wikitude SDK plugin |
wikitudeTrialLicenseKey | the license key for the EDU license |
startupConfiguration | startup configuration for AR experience (this config is for multiple targets) |
List<String> features = ["image_tracking"]; | this feature is needed for multiple targets scanning |
WidgetsBinding.instance.addObserver(this); | constantly listens to changes |
architectWidget = new ArchitectWidget | instantiating the ArchitectWidget |
Future<void> onArchitectWidgetCreated() async | this will load our custom AR experience written in HTML & JS |
Wikitude EDU License key
- Insert the license key from Canvas in the code above!
# HTML & JS API
- Creating an AR experience with a cross platform app framework like Flutter requires us to write HTML & JavaScript code.
- This code will be loaded into the
ArchitectWidgetso the Wikitude SDK can translate it into native code behind the scenes.
# Multiple targets example
- Create a
samplesfolder in the root folder of your project - Download the AR example
- Extract and copy the contents into the
samplesfolder - Update your
pubspec.yamlwith the following assets:
# The following section is specific to Flutter.
flutter:

  # The following line ensures that the Material Icons font is
  # included with your application, so that you can use the icons in
  # the material Icons class.
  uses-material-design: true

  assets:
    - samples/
    - samples/03_MultipleTargets_1_MultipleTargets/
    - samples/03_MultipleTargets_1_MultipleTargets/js/
    - samples/03_MultipleTargets_1_MultipleTargets/css/
    - samples/03_MultipleTargets_1_MultipleTargets/assets/
    - samples/03_MultipleTargets_1_MultipleTargets/assets/models/
1
2
3
4
5
6
7
8
9
10
11
12
13
14
15
2
3
4
5
6
7
8
9
10
11
12
13
14
15
Multiple Targets
- For more information about the multiple targets example you can go to the Wikitude documentation
# Run and test
- Select
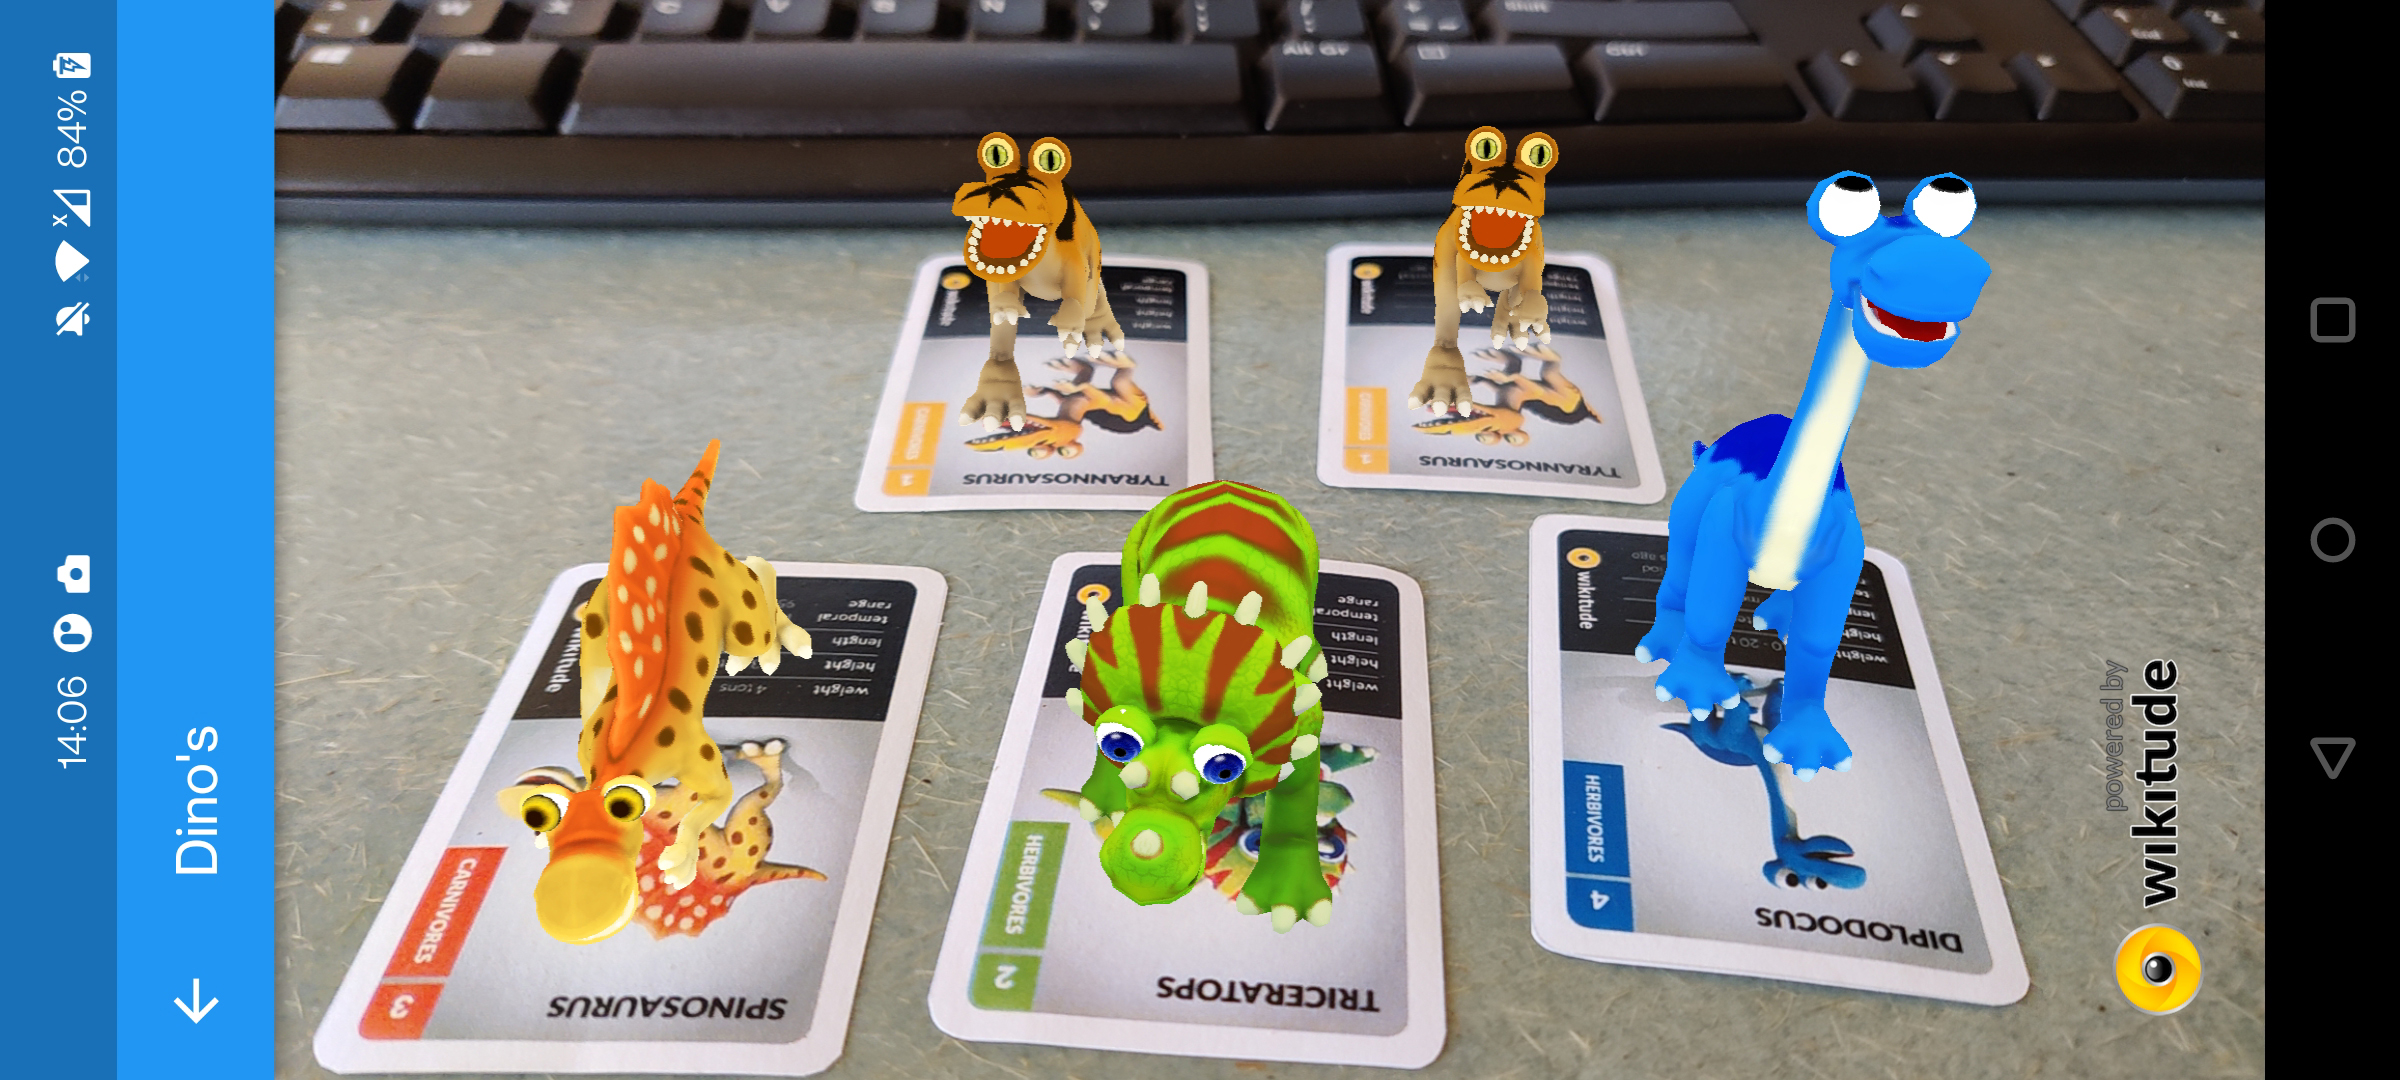
main.dartin the VS Code Explorer and run the app on your device - Scan some dino's!
- Result:
Runs on device only
- The AR experience can't be fully simulated on an Android Emulator. And of course, you can't test the app in your browser either.
- Find here a list of compatible devices
# Wikitude example application
- Wikitude created a Flutter example application with a lot of plugin examples. It's a great idea to run this application on your device and try the AR possibilities by yourself.