# Building a Stateful App
- The widgets we've seen so far are stateless widgets, meaning that once created they are immutable, as they do not keep any state information.
- If you want to have an app that interacts with your users, you expect things to change. As an example, we will build a currency converter, where the result must change based on the user input. Therefore we will build a stateful widget.
# What is state?
DEFINITION
State is information that can be used when a widget is built and can change during the lifetime of a widget. It's not the widget itself that will change, it's the state.
# Stateless vs. stateful widget
| Stateless widget | Statefull widget |
|---|---|
| No mutable state | Has mutable state |
| Overrides the build() method | Overides the createState() method and returns State |
| Use when the UI depends on information in the object itself | Use when the UI can change dynamically |
# How to implement a stateful widget?
4 STEPS
- Create a class that extends a stateful widget, override the createState method that returns a State
- Create the state class itself, with properties that may change
- Implement the build() method that will actually create the UI
- Call the setState method to change the value of the properties and the UI will be automatically re-rendered
# Building a Currency Converter app
# Create the app
- Create a new flutter application with name
currency_converter - Create the following directories in the
libfolder to organize your code:modelsfor our models (you figured out this one yourself)pagesfor the pages (as you might have guessed)widgetsfor our widgets (yes, what did you expect)
- Delete
widget_test.dartin thetestfolder - Replace the content of
main.dartwith the following code:
import 'package:flutter/material.dart';
import 'package:currency_converter/pages/converter.dart';
void main() {
runApp(const CurrencyConverterApp());
}
class CurrencyConverterApp extends StatelessWidget {
// This widget is the root of your application.
const CurrencyConverterApp({Key? key}) : super(key: key);
Widget build(BuildContext context) {
return MaterialApp(
debugShowCheckedModeBanner: false,
title: 'Currency Converter',
theme: ThemeData(
primarySwatch: Colors.green,
),
home: const ConverterPage(),
);
}
}
2
3
4
5
6
7
8
9
10
11
12
13
14
15
16
17
18
19
20
21
22
23
| code | description |
|---|---|
import 'package:flutter/material.dart'; | this package contains all Flutter widgets implementing Material Design |
import 'package:currency_converter/pages/converter.dart'; | import the file that contains the implementation of our first page (we will create this file in a moment) |
main | entry point of a Flutter application |
runApp | will run our Currency Converter app |
class CurrencyConverterApp ... | our app is a StatelessWidget |
MaterialApp() | defines that the app will use material design |
debugShowCheckedModeBanner | remove that uggly debug banner |
theme | we will use a green theme (for the banner, buttons, ...) |
home: const ConverterPage() | property to define the widget for the default route of the app, this will be the first (and only) page to show when the App starts |
# Create a very simple page
- In the
pagesfolder, create a new fileconverter.dart - Paste the following code
import 'package:flutter/material.dart';
class ConverterPage extends StatefulWidget {
const ConverterPage({Key? key}) : super(key: key);
State<StatefulWidget> createState() => _ConverterPageState();
}
class _ConverterPageState extends State {
  String _name = '';
Widget build(BuildContext context) {
return Scaffold(
appBar: AppBar(
title: const Text("Currency Converter"),
),
body: Container(
padding: const EdgeInsets.all(15.0),
child: Column(
children: <Widget>[
TextField(
decoration:
const InputDecoration(hintText: 'Please enter your name'),
onChanged: (String string) {
setState(() {
_name = string;
});
},
),
Container(
padding: const EdgeInsets.only(top: 15.0),
child: Text("Hello $_name!"),
),
],
),
),
);
}
}
2
3
4
5
6
7
8
9
10
11
12
13
14
15
16
17
18
19
20
21
22
23
24
25
26
27
28
29
30
31
32
33
34
35
36
37
38
39
40
41
- After running the app, you should see the page with a textbox you can type your name in
- When typing the name, the hello message changes immediately
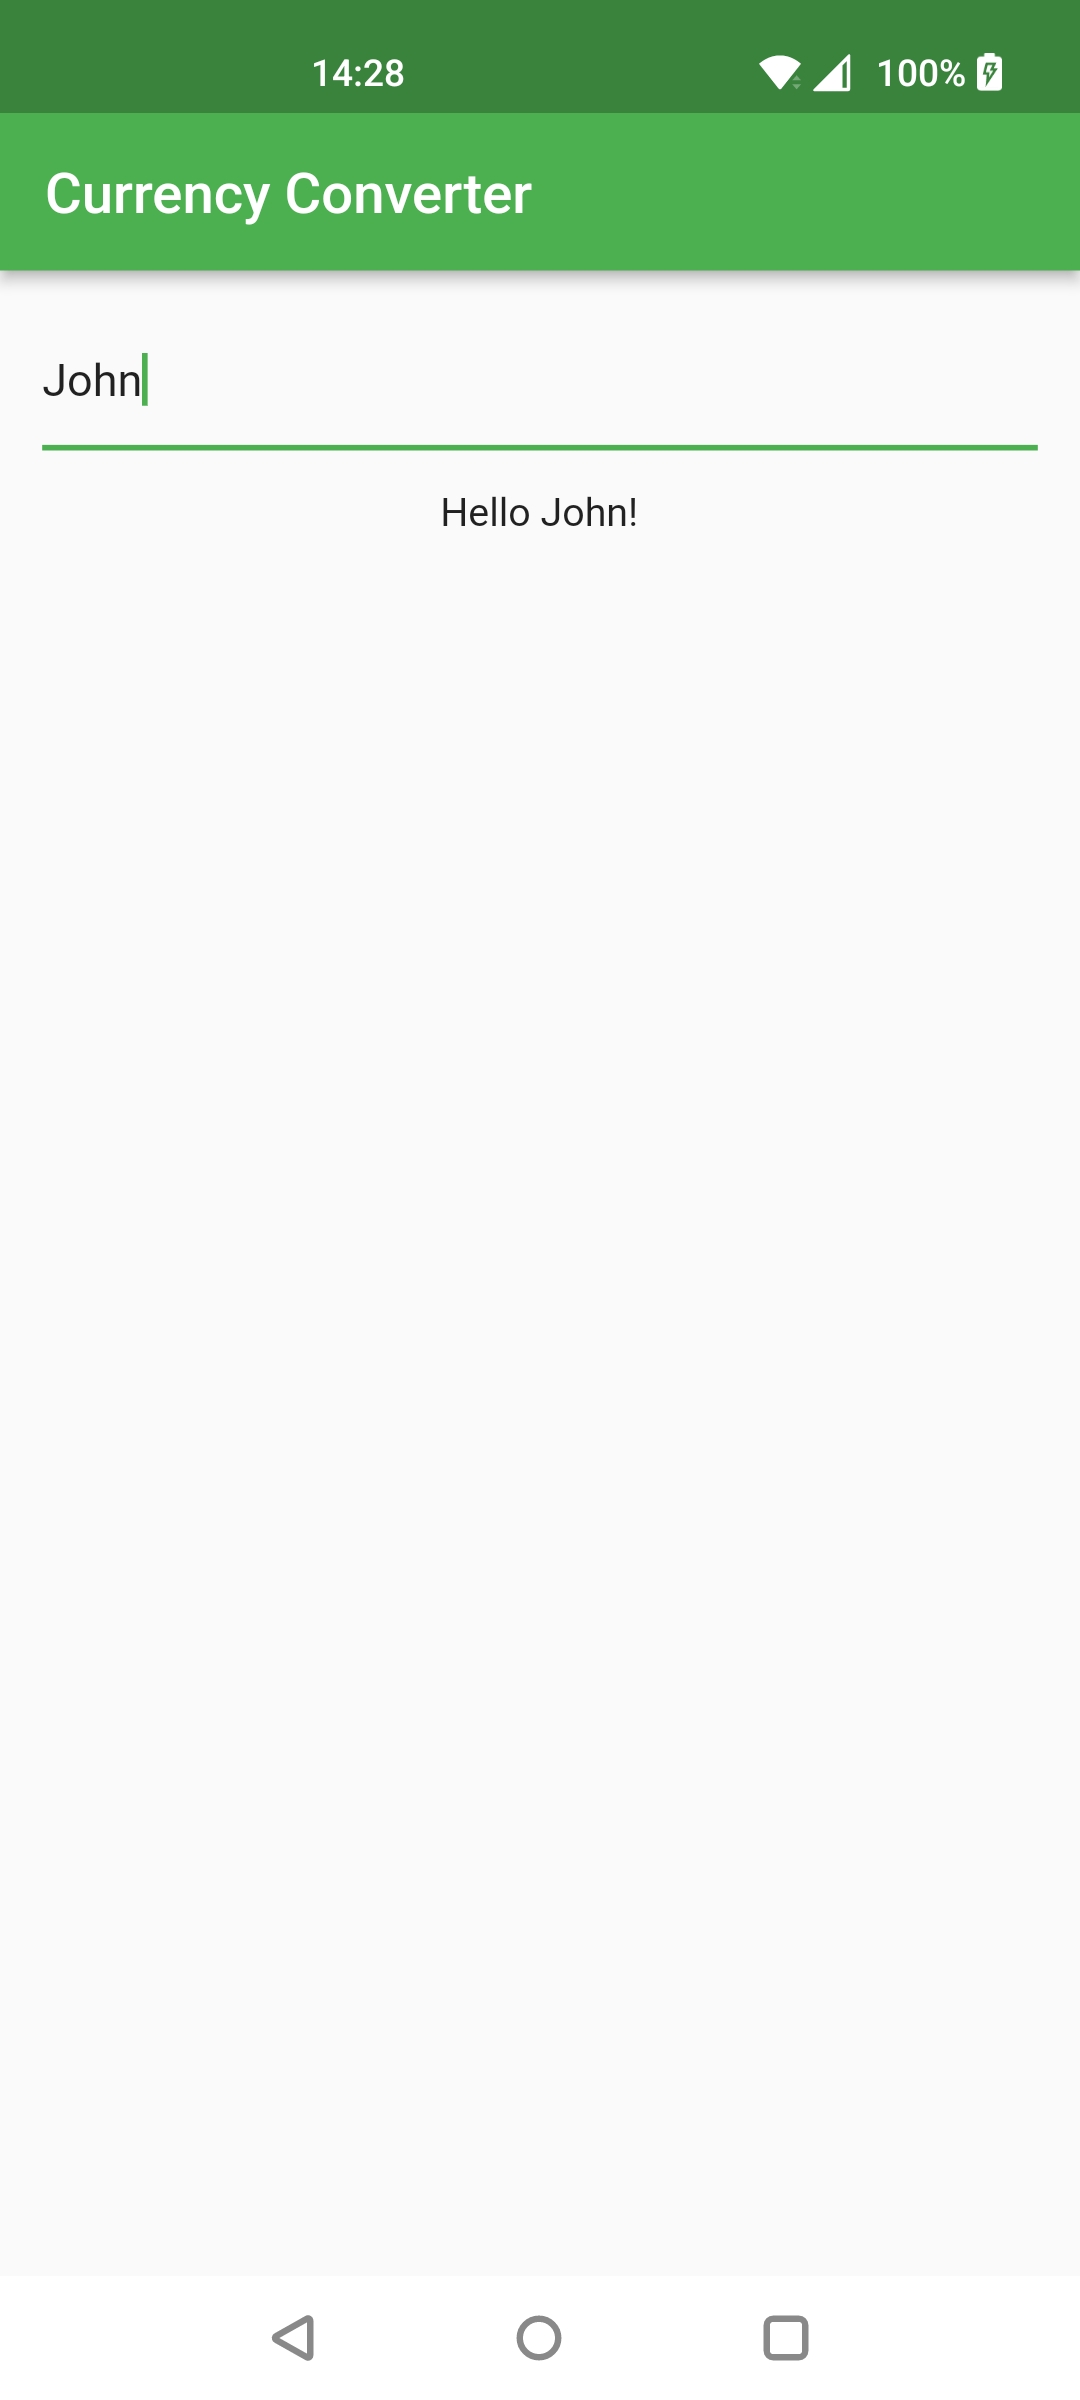
- Congrats, you've created your first stateful widget
# 4 Steps to create a stateful widget
Let's explain the code from above with a little more detail
# STEP 1
- Since we need state, our converter page is a stateful widget and will extend a stateful widget.
- Here we'll override the createState method, and using the fat arrow operator, we'll return a new
_ConverterPageState.
class ConverterPage extends StatefulWidget {
const ConverterPage({Key? key}) : super(key: key);
State<StatefulWidget> createState() => _ConverterPageState();
}
2
3
4
5
6
# STEP 2
- Next, we need to create the state.
- As a naming convention, it's a good idea to put an underscore to emphasize that this class is private.
- Also, we'll give it the same name as the widget's name, plus state. So, in this case,
_ConverterPageState. - Create the state-properties that may change. In our case, the
_name, which is also private.
class _ConverterPageState extends State {
String _name = '';
2
# STEP 3
- Implement the build() method that will actually create the UI
- We'll return a Scaffold with an appBar property whose title is a Text "Currency Converter"
- On the page, we use a TextField. We want to do something when the text in the TextField changes. So, we need to handle the onChanged event.
Widget build(BuildContext context) {
return Scaffold(
appBar: AppBar(
title: const Text("Currency Converter"),
),
body: Container(
padding: const EdgeInsets.all(15.0),
child: Column(
children: <Widget>[
TextField(
decoration:
const InputDecoration(hintText: 'Please enter your name'),
onChanged: (String string) {
...
2
3
4
5
6
7
8
9
10
11
12
13
14
15
TIP
We added a decoration to the TextField that takes an InputDecoration. Among other things, you can specify a hintText. More on this later.
# STEP 4
- Inside the function that handles the onChanged event, we call the setState method to update the name property that we have defined above, with the new value of the TextField (string parameter).
- Under the TextField we placed a Text widget to give feedback to our user. This text will be updated when the name changes.
    ...
              onChanged: (String string) {
                setState(() {
                  _name = string;
                });
              },
            ),
            Container(
              padding: const EdgeInsets.only(top: 15.0),
              child: Text("Hello $_name!"),
            ),
    ...
2
3
4
5
6
7
8
9
10
11
12
- We have completed the steps, required to use the state in our app.
CODE SNIPPETS
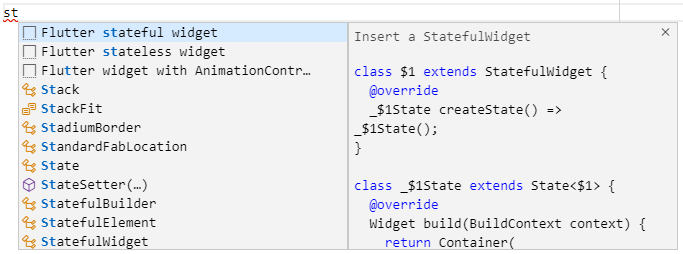
It is very easy to insert some Flutter code snippets in Visual Studio Code. Just type st and from the intellisense popup,
choose the snippet you want to insert and type tab.
# Improving the UI
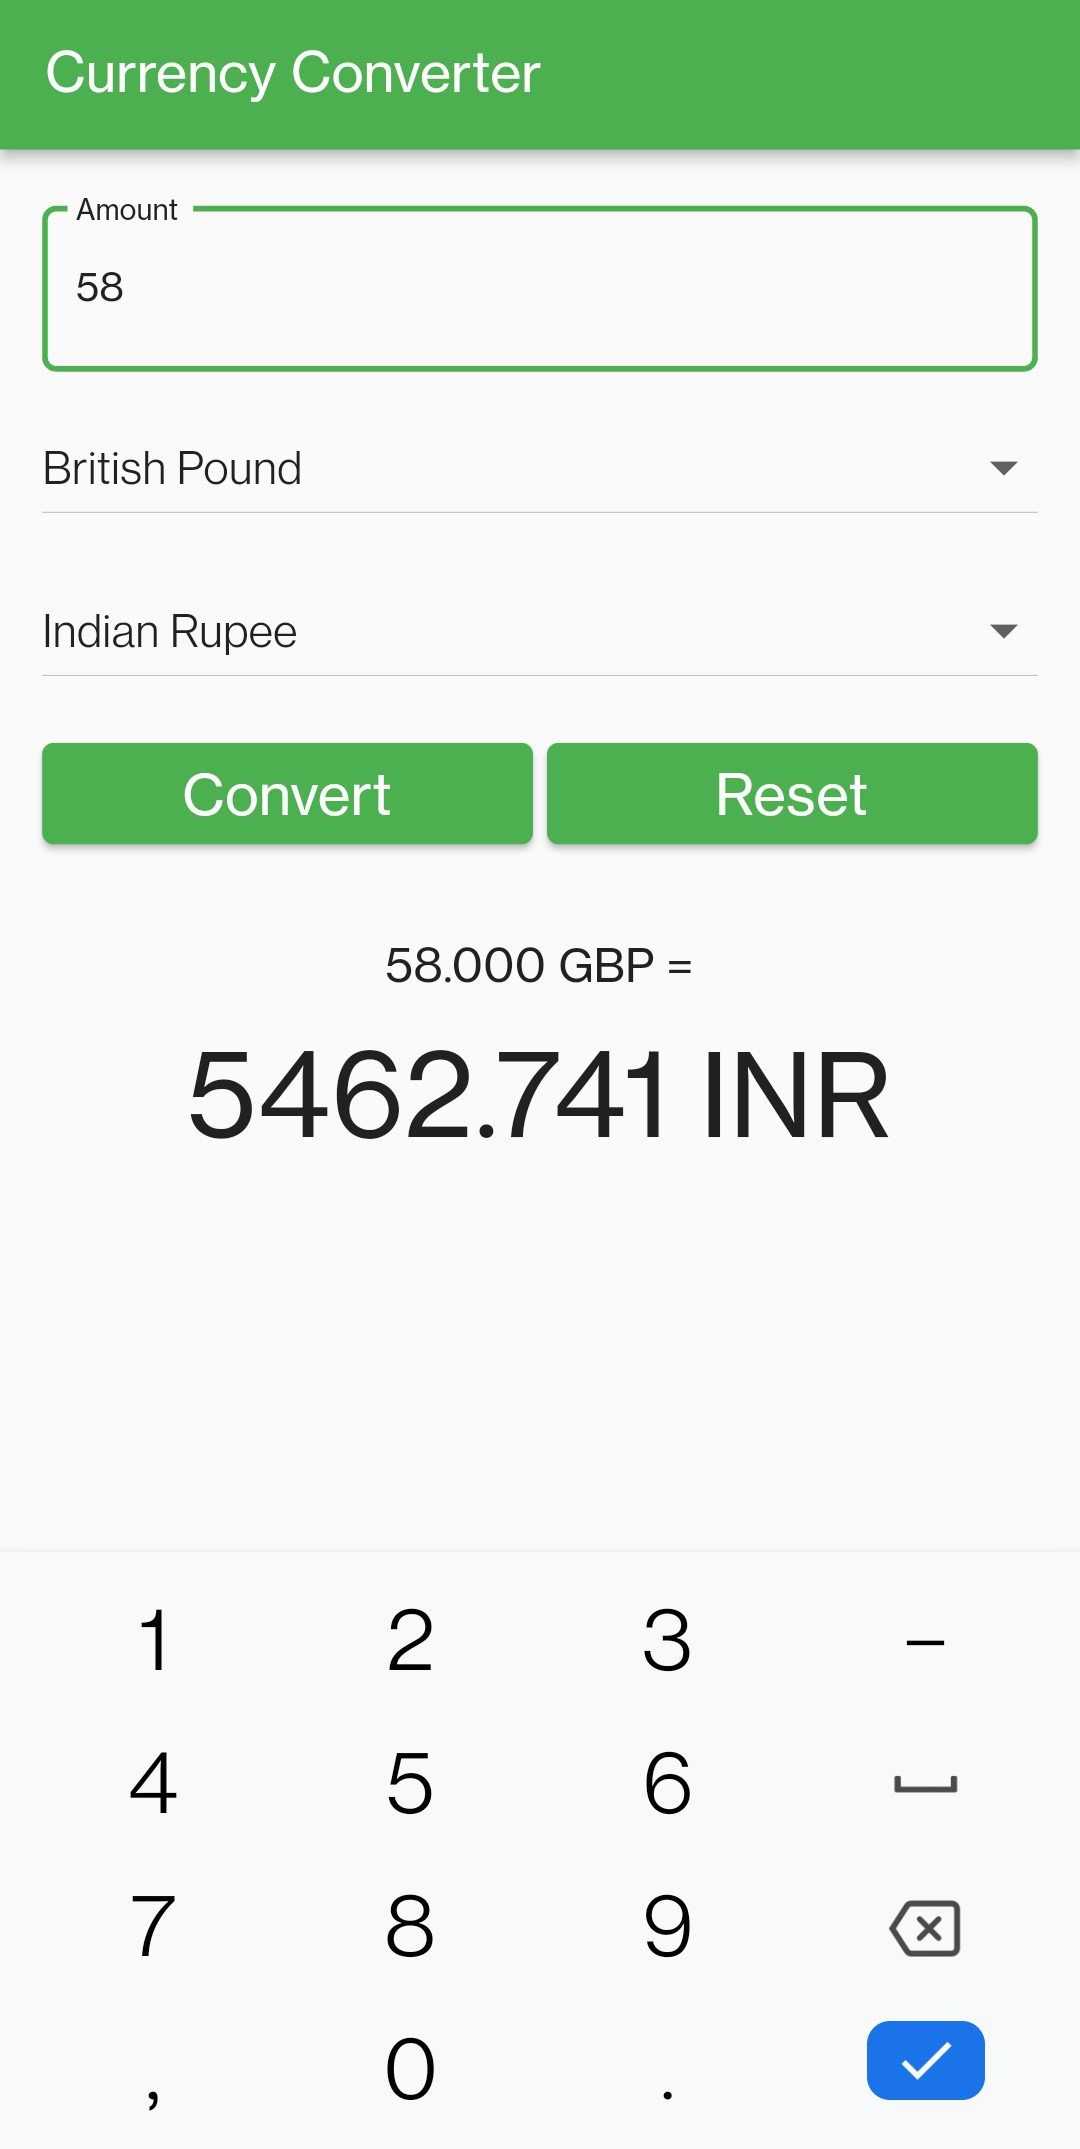
Since the goal of our app was to create a currency converter, let's change the UI so the user can input an amount. We'll add some buttons and make life for our user a little bit easier using some text decorations. A lot of UI modifications, so let's get started.
Add a default textstyle and a formpadding variable to the build method
Widget build(BuildContext context) {
TextStyle? textStyle = Theme.of(context).textTheme.bodyText1;
double formPadding = 5.0;
return Scaffold(
...
2
3
4
5
6
# Using a TextEditingController
- In the hello example, we used the onChanged event to write the changes in the name from the TextField widget to the
_nameproperty. Now we will use a TextEditingController. Whenever a user modifies a text field with an associated TextEditingController the text field updates its value, and the controller can notify any listeners. - Delete the
_nameproperty and add a TextEditingController instead.
class _ConverterPageState extends State {
  TextEditingController amountController = TextEditingController();
  ...
2
3
- Define two state properties
_fromamountand_toamount. They will be used to display the amount to be converted and the converted amount respectively.
class _ConverterPageState extends State {
  TextEditingController amountController = TextEditingController();

  String _fromamount = "";
  String _toamount = "";
2
3
4
5
# A Textfield with InputDecoration
- Replace the TextField with the Padding widget. We use the default top and bottom padding. Our TextField has some nice user-friendly decorations and a rounded BorderStyle.
            Padding(
              padding: EdgeInsets.only(bottom: formPadding, top: formPadding),
              child: TextField(
                controller: amountController,
                style: textStyle,
                keyboardType: TextInputType.number,
                decoration: InputDecoration(
                  hintText: "e.g. 17.85",
                  labelText: "Amount",
                  labelStyle: textStyle,
                  border: OutlineInputBorder(
                    borderRadius: BorderRadius.circular(5.0),
                  ),
                ),
              ),
            ),
2
3
4
5
6
7
8
9
10
11
12
13
14
15
16
Remark
We removed the onChanged event from the TextField and used our amountController instead. More on this right away.
- Replace the one Container with two Containers. The Containers will be used to display the Text's with the amount to be converted and the converted amount. As you can see, we've increased the size of the text.
            Container(
              margin: EdgeInsets.only(top: formPadding * 5),
              child: Text(
                _fromamount,
                style: textStyle,
                textScaleFactor: 1.2,
              ),
            ),
            Container(
              margin: EdgeInsets.only(top: formPadding),
              child: Text(
                _toamount,
                style: textStyle,
                textScaleFactor: 3,
              ),
            ),
2
3
4
5
6
7
8
9
10
11
12
13
14
15
16
# Adding Buttons
- To check if everything is still working we add two buttons above the two containers. One button to calculate the conversion. The other one to reset the amount. We will also add some extra padding space above the buttons. Since we like the buttons to be side by side, we use a Row widget with two ElevatedButton children and a Container to add some space between the buttons.
            Container(
              height: formPadding,
            ),
            Row(children: [
              Expanded(
                child: ElevatedButton(
                  onPressed: () {
                    _calculate();
                  },
                  child: const Text(
                    'Convert',
                    textScaleFactor: 1.5,
                  ),
                ),
              ),
              Container(
                width: formPadding,
              ),
              Expanded(
                child: ElevatedButton(
                  onPressed: () {
                    _reset();
                  },
                  child: const Text(
                    'Reset',
                    textScaleFactor: 1.5,
                  ),
                ),
              ),
            ]),
2
3
4
5
6
7
8
9
10
11
12
13
14
15
16
17
18
19
20
21
22
23
24
25
26
27
28
29
30
# Programming the onPressed event handlers
- In order the buttons to work, we need to implement the event handlers
_resetand_calculate.
  void _reset() {
    amountController.text = '';
    setState(() {
      _fromamount = '';
      _toamount = '';
    });
  }

  void _calculate() {
    double amount = double.parse(amountController.text);
    double result = amount;

    setState(() {
      _fromamount = '${amount.toStringAsFixed(3)} amount';
      _toamount = '${result.toStringAsFixed(3)} TODO';
    });
  }
2
3
4
5
6
7
8
9
10
11
12
13
14
15
16
17
Remark
- As you can see, the amount you type is automatically updated in the amountController. So you don't need to program the onChanged any more.
- To update the Text widgets, you need to use the setState method to change
_fromamountand_toamount. The calculation of the currency conversion is a TODO.
- Try to run your app. It should look like a currency converter a little bit more.
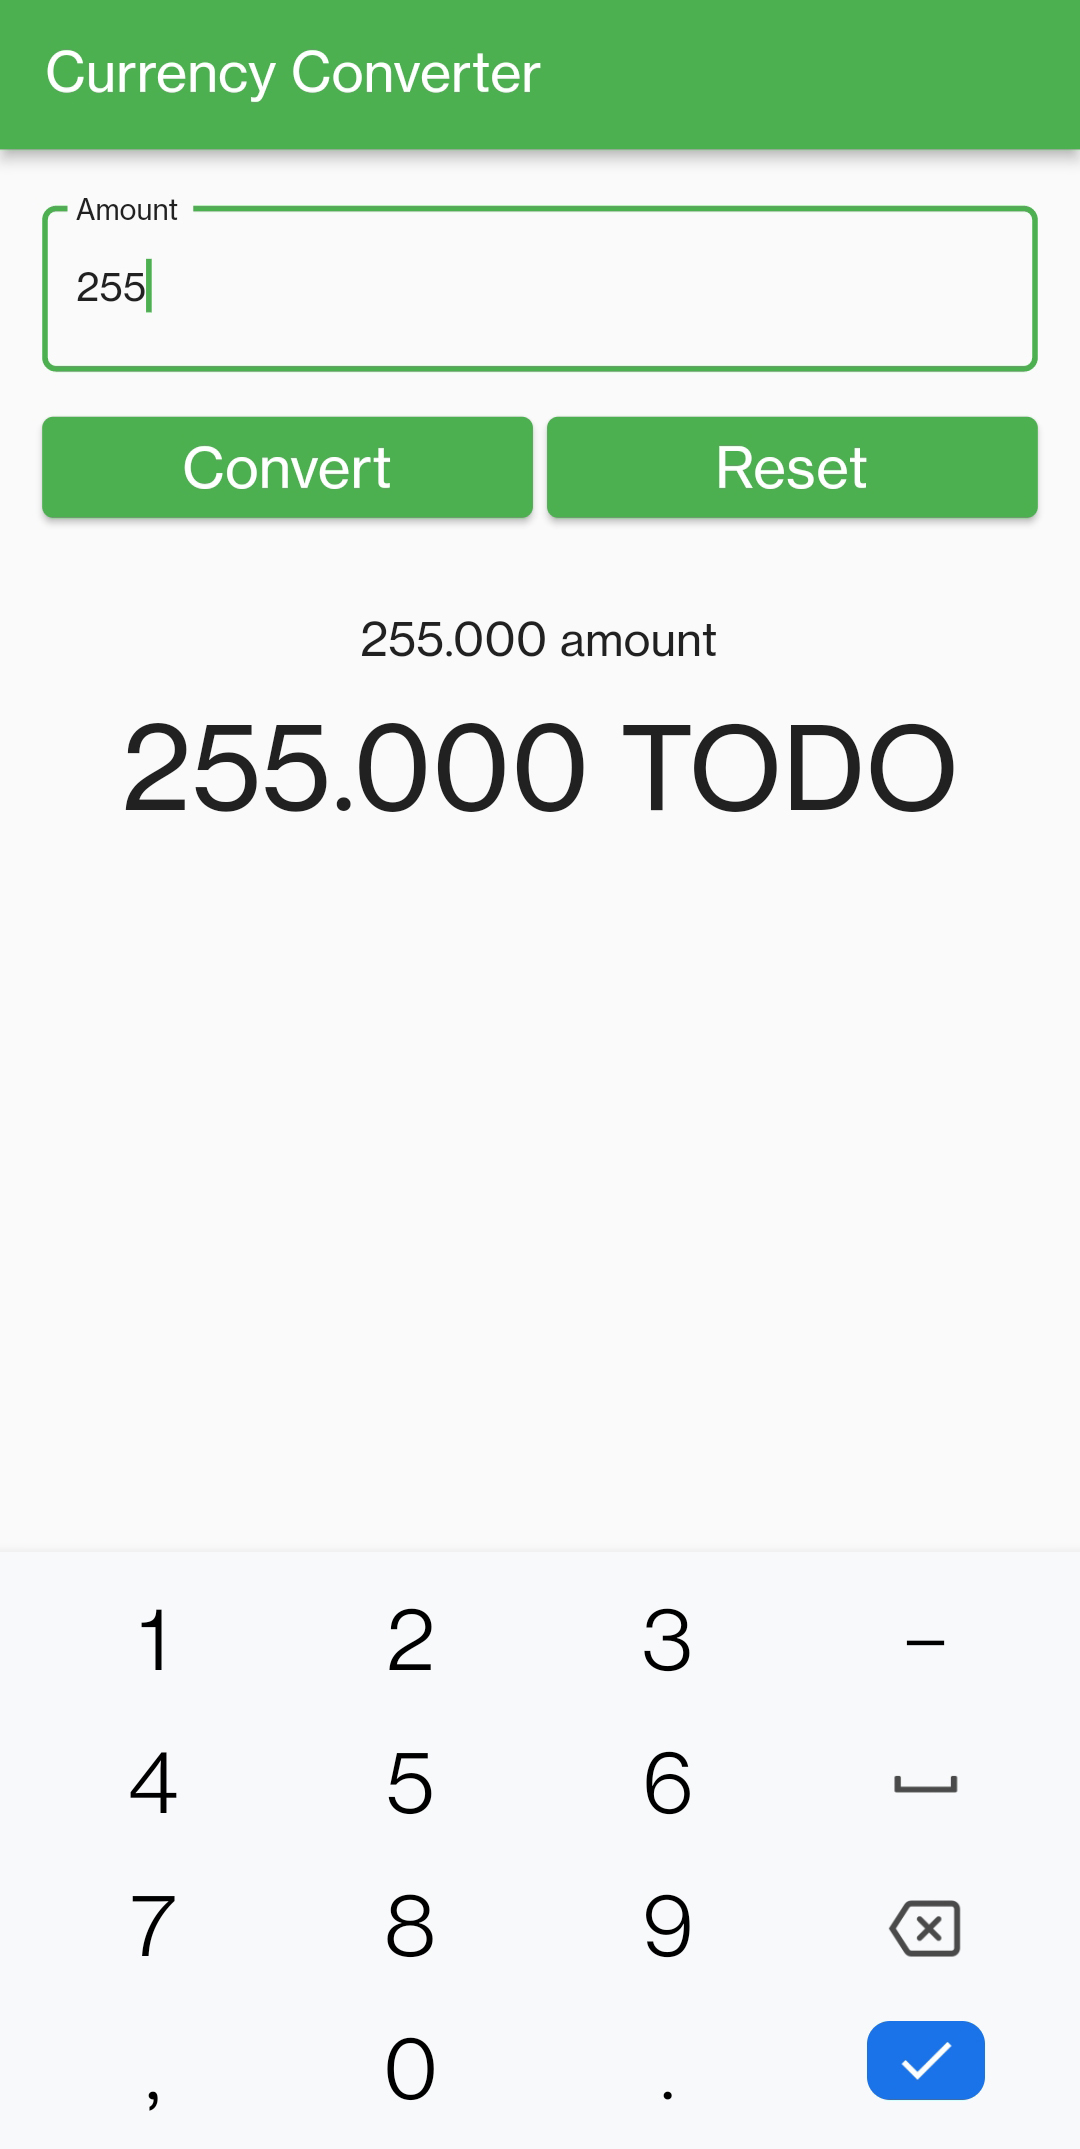
- There are two things missing. We can't select the currencies we want to be converted. And the conversion as well needs to be programmed. Let's fix this in the next part.
# Using Models
# Assets
- Let us first add the flags of the currencies that will be supported within our app.
- Download assets
- Create a folder
assetsin the root of your application and copy the png's into it. - Next open
pubspec.yamland add the assets to your application
flutter:

  # The following line ensures that the Material Icons font is
  # included with your application, so that you can use the icons in
  # the material Icons class.
  uses-material-design: true

  # To add assets to your application, add an assets section, like this:
  assets:
    - assets/CAD.png
    - assets/CNY.png
    - assets/EUR.png
    - assets/GBP.png
    - assets/INR.png
    - assets/SGD.png
    - assets/USD.png
2
3
4
5
6
7
8
9
10
11
12
13
14
15
16
# Currency class
- Create a new file
currency.dartin themodelsfolder - Next create a
Currencyclass
class Currency {
  String name;
  String shortname;
  double _value;

  Currency(this.name, this.shortname, this._value);

  double get value {
    return _value;
  }

  set value(double value) {
    if (value > 0) {
      _value = value;
    }
  }
}
2
3
4
5
6
7
8
9
10
11
12
13
14
15
16
17
- Our
Currencyclass has three fields:name,shortnameand_value - For
nameandshortname, we use the default getter and setter, since there's no extra code. - Because the
valueof a currency can't be negative, we need to add some extra code to the setter. So we need to override the default setter and getter. - We use an underscore for the private
_valueandvaluefor the public getter and setter. - Because we use the default setter an getter, we just have to write
nameandshortname. - There's also a constructor with the same name as the class. The three parameter will be assigned automatically to the three fields.
# Adding the list of currencies
- In a normal situation our app would use an api to get the currency data. This will be covered later in this course. For now, we will use a limited list of hardcoded currencies.
- Import the
Currencyclass and fill an array with seven currencies
import 'package:flutter/material.dart';
import 'package:currency_converter/models/currency.dart';
class ConverterPage extends StatefulWidget {
State<StatefulWidget> createState() => _ConverterPageState();
}
class _ConverterPageState extends State {
TextEditingController amountController = TextEditingController();
String _fromamount = "";
String _toamount = "";
final _currencies = [
Currency('US Dollar', 'USD', 1),
Currency('Euro', 'EUR', 1.16),
Currency('British Pound', 'GBP', 1.2715),
Currency('Indian Rupee', 'INR', 0.0135),
Currency('Chinese yuan', 'CNY', 0.1466),
Currency('Canadian Dollar', 'CAD', 0.7458),
Currency('Singapore Dollar', 'SGD', 0.7268)
];
2
3
4
5
6
7
8
9
10
11
12
13
14
15
16
17
18
19
20
21
22
23
24
- The shortname of the currency is the same as the name of the asset with the flag. We will use this later to make our UI more attractive.
- The currency value is the exchange rate in relation to the dollar. So 1 euro is worth 1,16 dollar. Normally these values should be retrieved real time using an api. We'll cover this later in the course.
# Extra state-properties
- We need to add two extra state-properties:
_fromfor the currency of the amount that needs to be converted,_tofor the currency the amount needs to be converted to. More info about the late keyword... later. - Let's add an
initStatemethod to initialize the state-properties. We choose euro for the source currency and dollar for the destination currency.
class _ConverterPageState extends State {
TextEditingController amountController = TextEditingController();
String _fromamount = "";
String _toamount = "";
late Currency _from;
late Currency _to;
final _currencies = [
Currency('US Dollar', 'USD', 1),
Currency('Euro', 'EUR', 1.16),
Currency('British Pound', 'GBP', 1.2715),
Currency('Indian Rupee', 'INR', 0.0135),
Currency('Chinese yuan', 'CNY', 0.1466),
Currency('Canadian Dollar', 'CAD', 0.7458),
Currency('Singapore Dollar', 'SGD', 0.7268)
];
void initState() {
super.initState();
_from = _currencies[1];
_to = _currencies[0];
}
2
3
4
5
6
7
8
9
10
11
12
13
14
15
16
17
18
19
20
21
22
23
24
LATE
- Declaration of variables that will be initialize later is done using late modifier.
- When using late before variables make sure that the variables must be initialized later. Otherwise you can encounter a runtime error when the variable is used.
INITSTATE
- The framework will call the
initStatemethod exactly once when this object (ConverterPage) is inserted into the tree. - Override this method if you want to perform initializations.
- If you override this method, make sure the method starts with a call to
super.initState().
# Currency conversion
- We now can complete our method that calculates the conversion between the two currencies. Remember, it was on our todo list.
- Replace the old calculate methode with this new one
  void _calculate() {
    double amount = double.parse(amountController.text);
    double result = amount * _from.value / _to.value;

    setState(() {
      _fromamount = '${amount.toStringAsFixed(3)} ${_from.shortname} =';
      _toamount = '${result.toStringAsFixed(3)} ${_to.shortname}';
    });
  }
2
3
4
5
6
7
8
9
- Try to run your app and convert an amount from euro to dollar (the default currencies, see
initState)
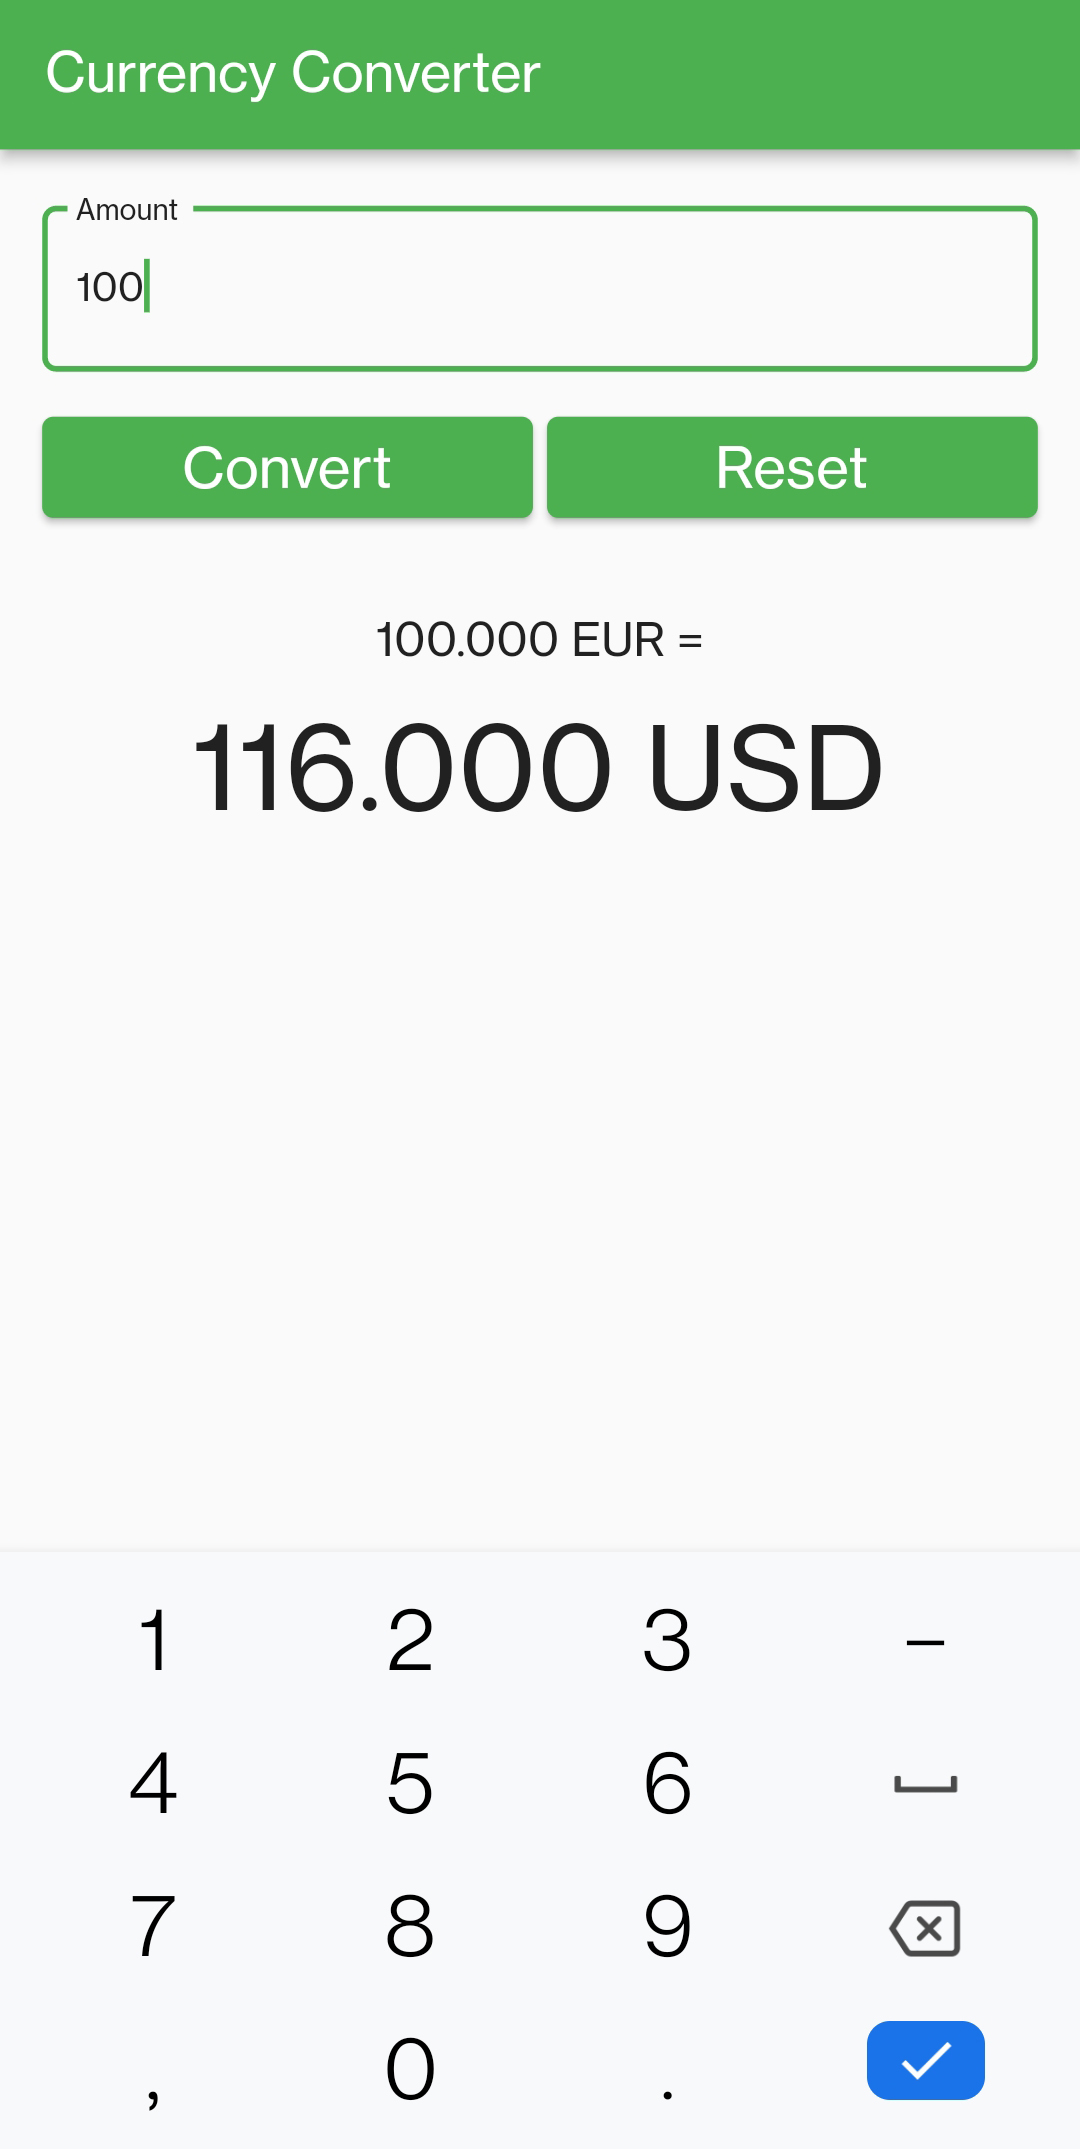
- We're almost there. The only thing we need to do, is create two DropdownButton's so the user can choose his own currencies. Otherwise it would be a rather useless app. This will be our final step.
# Create a custom widget
- Since we need to have two DropdownButton's, it's a good idea to create a custom widget and use this two times: for the source and destination currency.
TIP
It is always a good idea to build your app in a modular way. So try to build your own small widgets instead of putting all your code nested in one big widget. We cannot say this enough, splitting your page into seperate custom widgets, will improve the readability, simplicity and ease of maintenance of your code.
# Inherit a StatelessWidget
- Create a new file
currencydropdownbutton.dartin thewidgetsfolder - Paste the code to create you own custom DropdownButton widget
import 'package:flutter/material.dart';

import 'package:currency_converter/models/currency.dart';

typedef MyCallback = void Function(Currency currency);

class CurrencyDropdownButtonWidget extends StatelessWidget {
  final String labelText;
  final Currency selectedCurrency;
  final List<Currency> currencies;
  final MyCallback onCurrencySelected;

  const CurrencyDropdownButtonWidget(
      {Key? key,
      required this.labelText,
      required this.selectedCurrency,
      required this.currencies,
      required this.onCurrencySelected})
      : super(key: key);

}
2
3
4
5
6
7
8
9
10
11
12
13
14
15
16
17
18
19
20
21
| code | description |
|---|---|
class CurrencyDropdownButtonWidget extends StatelessWidget | Our CurrencyDropdownButtonWidget inherits from StatelessWidget. But if you would like to build a stateful widget, this is possible too. |
final String labelText; | When building your own widget, the first thing you've got to do is figuring out what data your widget needs to work properly. In our case we need a label ("from" or "to"), |
final Currency selectedCurrency; | the currency to show in the Dropdown in the beginning, |
final List<Currency> currencies; | a list of currencies for the user to choose from (we will show these in the Dropdown) |
final MyCallback onCurrencySelected; | and a callback function to use when the users selects a currency from the list. |
typedef MyCallback = void Function(Currency currency); | Because we very probably want to know which currency the user has selected the callback function has the selected currency as a parameter. |
const CurrencyDropdownButtonWidget({ ... }); | The constructor of the widget. We will use the constructor to pass the necessary properties. |
# Using a DropdownButton and DropdownMenuItems
- Next we need to implement the
buildmethod to render the widget
Widget build(BuildContext context) {
return DropdownButton<Currency>(
isExpanded: true,
items: currencies.map((Currency currency) {
return DropdownMenuItem<Currency>(
value: currency,
child: Text(currency.name),
);
}).toList(),
value: selectedCurrency,
onChanged: (value) {
onCurrencySelected(value);
},
);
}
2
3
4
5
6
7
8
9
10
11
12
13
14
15
16
| code | description |
|---|---|
return DropdownButton<Currency> | DropdownButton is a generic type. Here we'll use it to show Currency objects. |
items: currencies.map((Currency currency) | We'll iterate over all currencies and create a DropdownMenuItem for each of them. |
return DropdownMenuItem<Currency> | Every DropdownMenuItem represents one currency. |
value: currency | When the user selects a DropdownMenuItem, Flutter will return the whole currency object. |
child: Text(currency.name) | We'll show the currency name for every currency in the list. |
value: selectedCurrency | The selectedCurrency will be selected in the beginning. |
onCurrencySelected(value); | When the user selects a currency, the callback function will be triggered. |
NULL CHECK
- As you have probably noticed, there's a problem with the
valueparameter: "The argument type 'Currency?' can't be assigned to the parameter type 'Currency'." - This is because the value parameter of the onChanged method is optional and the
currencyparameter of our callback function isn't. - We'll add a null check to fix this. This can be done short handed by adding an exclamation mark behind the
valueparameter:onCurrencySelected(value!);
# Integrate the custom widget in our page
- Our widget is ready. Let's try it on our page. Open
converter.dartand import the custom widget
import 'package:flutter/material.dart';

import 'package:currency_converter/models/currency.dart';
import 'package:currency_converter/widgets/currencydropdownbutton.dart';

...
2
3
4
5
6
- Add two custom CurrencyDropdownButtonWidget widgets (with padding) to the form (after textfield with the Padding widget)
...

              ),
            ),
            Padding(
              padding: EdgeInsets.only(bottom: formPadding, top: formPadding),
              child: CurrencyDropdownButtonWidget(
                  labelText: "From",
                  selectedCurrency: _from,
                  currencies: _currencies,
                  onCurrencySelected: (currency) {
                    _onFromChanged(currency);
                  }),
            ),
            Padding(
              padding: EdgeInsets.only(bottom: formPadding, top: formPadding),
              child: CurrencyDropdownButtonWidget(
                  labelText: "To",
                  selectedCurrency: _to,
                  currencies: _currencies,
                  onCurrencySelected: (currency) {
                    _onToChanged(currency);
                  }),
            ),
            Container(
              height: formPadding,
            ),

...
2
3
4
5
6
7
8
9
10
11
12
13
14
15
16
17
18
19
20
21
22
23
24
25
26
27
28
29
- Add the two event handlers
_onFromChangedand_onToChanged. These event handlers will be executed when the user selects a source or destination currency. - In the event handlers we will update the two state-properties with the selected currency
  void _onFromChanged(Currency currency) {
    setState(() {
      _from = currency;
    });
  }

  void _onToChanged(Currency currency) {
    setState(() {
      _to = currency;
    });
  }
2
3
4
5
6
7
8
9
10
11
REMARK
As you can see, our page widget stays clean and we can simply reuse the code from our CurrencyDropdownButtonWidget widget and generate two of them.
- It should be possible now, to select the currencies
# The final touch
- Not bad, but we can do better. Let's try to pimp our
CurrencyDropdownButtonWidgeta little bit. - Replace the build method of the custom widget with the code below
Widget build(BuildContext context) {
TextStyle? textStyle = Theme.of(context).textTheme.bodyText1;
return InputDecorator(
decoration: InputDecoration(
contentPadding: const EdgeInsets.all(10),
labelText: labelText,
border: OutlineInputBorder(
borderRadius: BorderRadius.circular(5.0),
),
),
child: DropdownButton<Currency>(
isExpanded: true,
items: currencies.map((Currency currency) {
return DropdownMenuItem<Currency>(
value: currency,
child: Row(
crossAxisAlignment: CrossAxisAlignment.center,
children: <Widget>[
Image(
image: AssetImage("assets/${currency.shortname}.png"),
width: 40.0,
height: 40.0),
const Padding(
padding: EdgeInsets.only(left: 10.0),
),
Column(
crossAxisAlignment: CrossAxisAlignment.start,
children: [
Text(
currency.shortname,
textScaleFactor: 1.3,
),
Text(currency.name),
],
)
],
),
);
}).toList(),
value: selectedCurrency,
style: textStyle,
onChanged: (value) {
onCurrencySelected(value!);
},
underline: const SizedBox.shrink(),
),
);
}
2
3
4
5
6
7
8
9
10
11
12
13
14
15
16
17
18
19
20
21
22
23
24
25
26
27
28
29
30
31
32
33
34
35
36
37
38
39
40
41
42
43
44
45
46
47
48
49
Since you are already quite familiar with building a UI in dart, maybe you can figure out the code yourself? As you can see, we've fully customized the DropdownMenuItem.
Run the app and you should get this beautiful professional looking currency converter app. Well done!

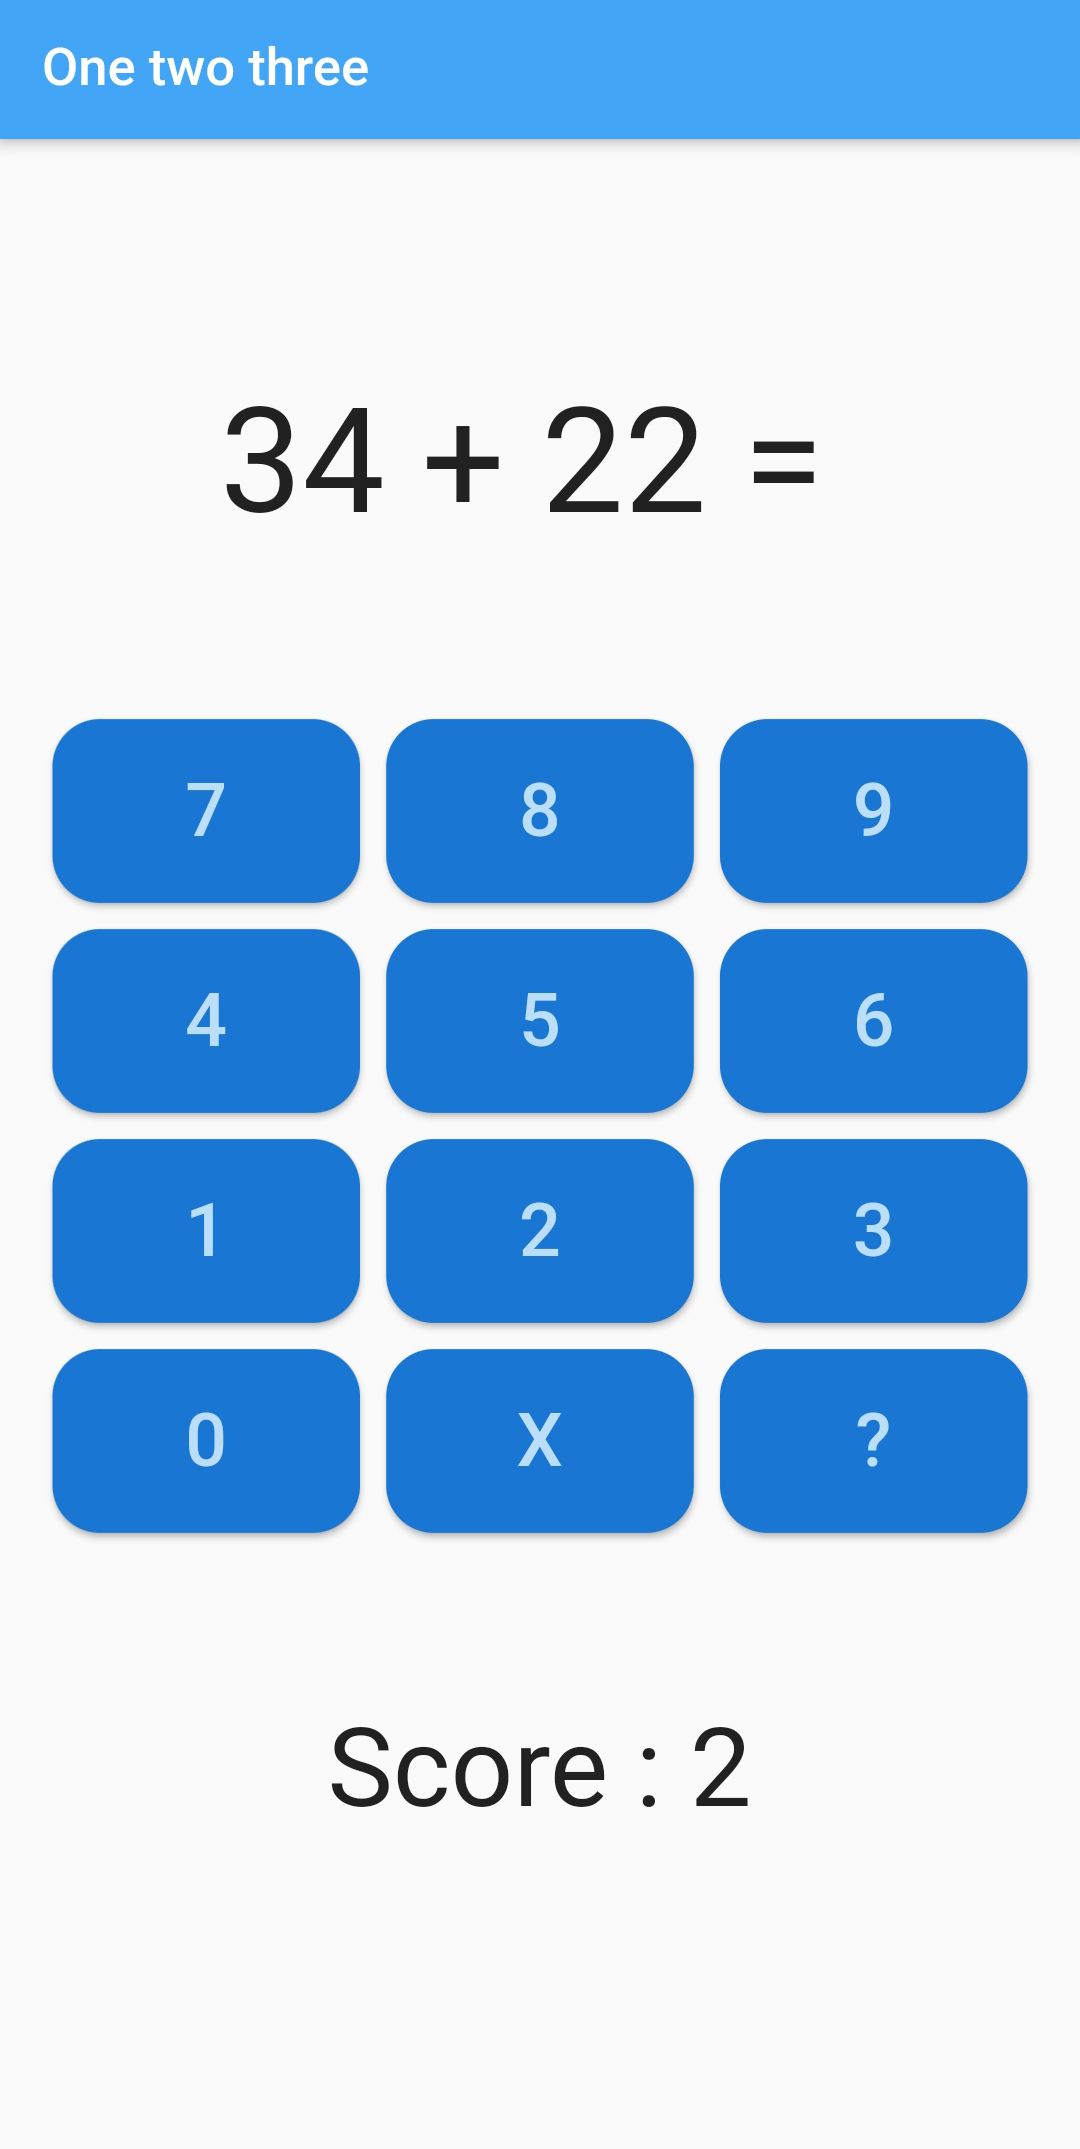
# Exercise 1 - One two three (part 2)
- In the first part of this exercise you have completed the UI.
# Stateful Widget
- Open
home.dartin thepagesfolder. As you can see, yourHomePagewidget is a stateless widget. Refactor the code and make yourHomePagea stateful widget. - Create four properties in your stateful widget:
_operation: the arithmatical operation that has to be calculated, "34 + 22 =" in the above example_result: the correct answer, 56 on the page above_answer: the answer of the child performing the calculus, still empty in the above screenshot_score: the current score, 2
# Complete the app
- When opening the app, generate a sum of two random numbers. The result is less then 100. After that you can do the subtraction, division and multiplication as well. Always below 100 and whole numbers.
- If the user pushes the number buttons, the number of the button pressed is appended to the answer.
- When the user chooses the "X" button, cut off the last number from the answer.
- After tapping the "?" button, check if the answer is correct (add 1 to the score if so), and show the next operation.
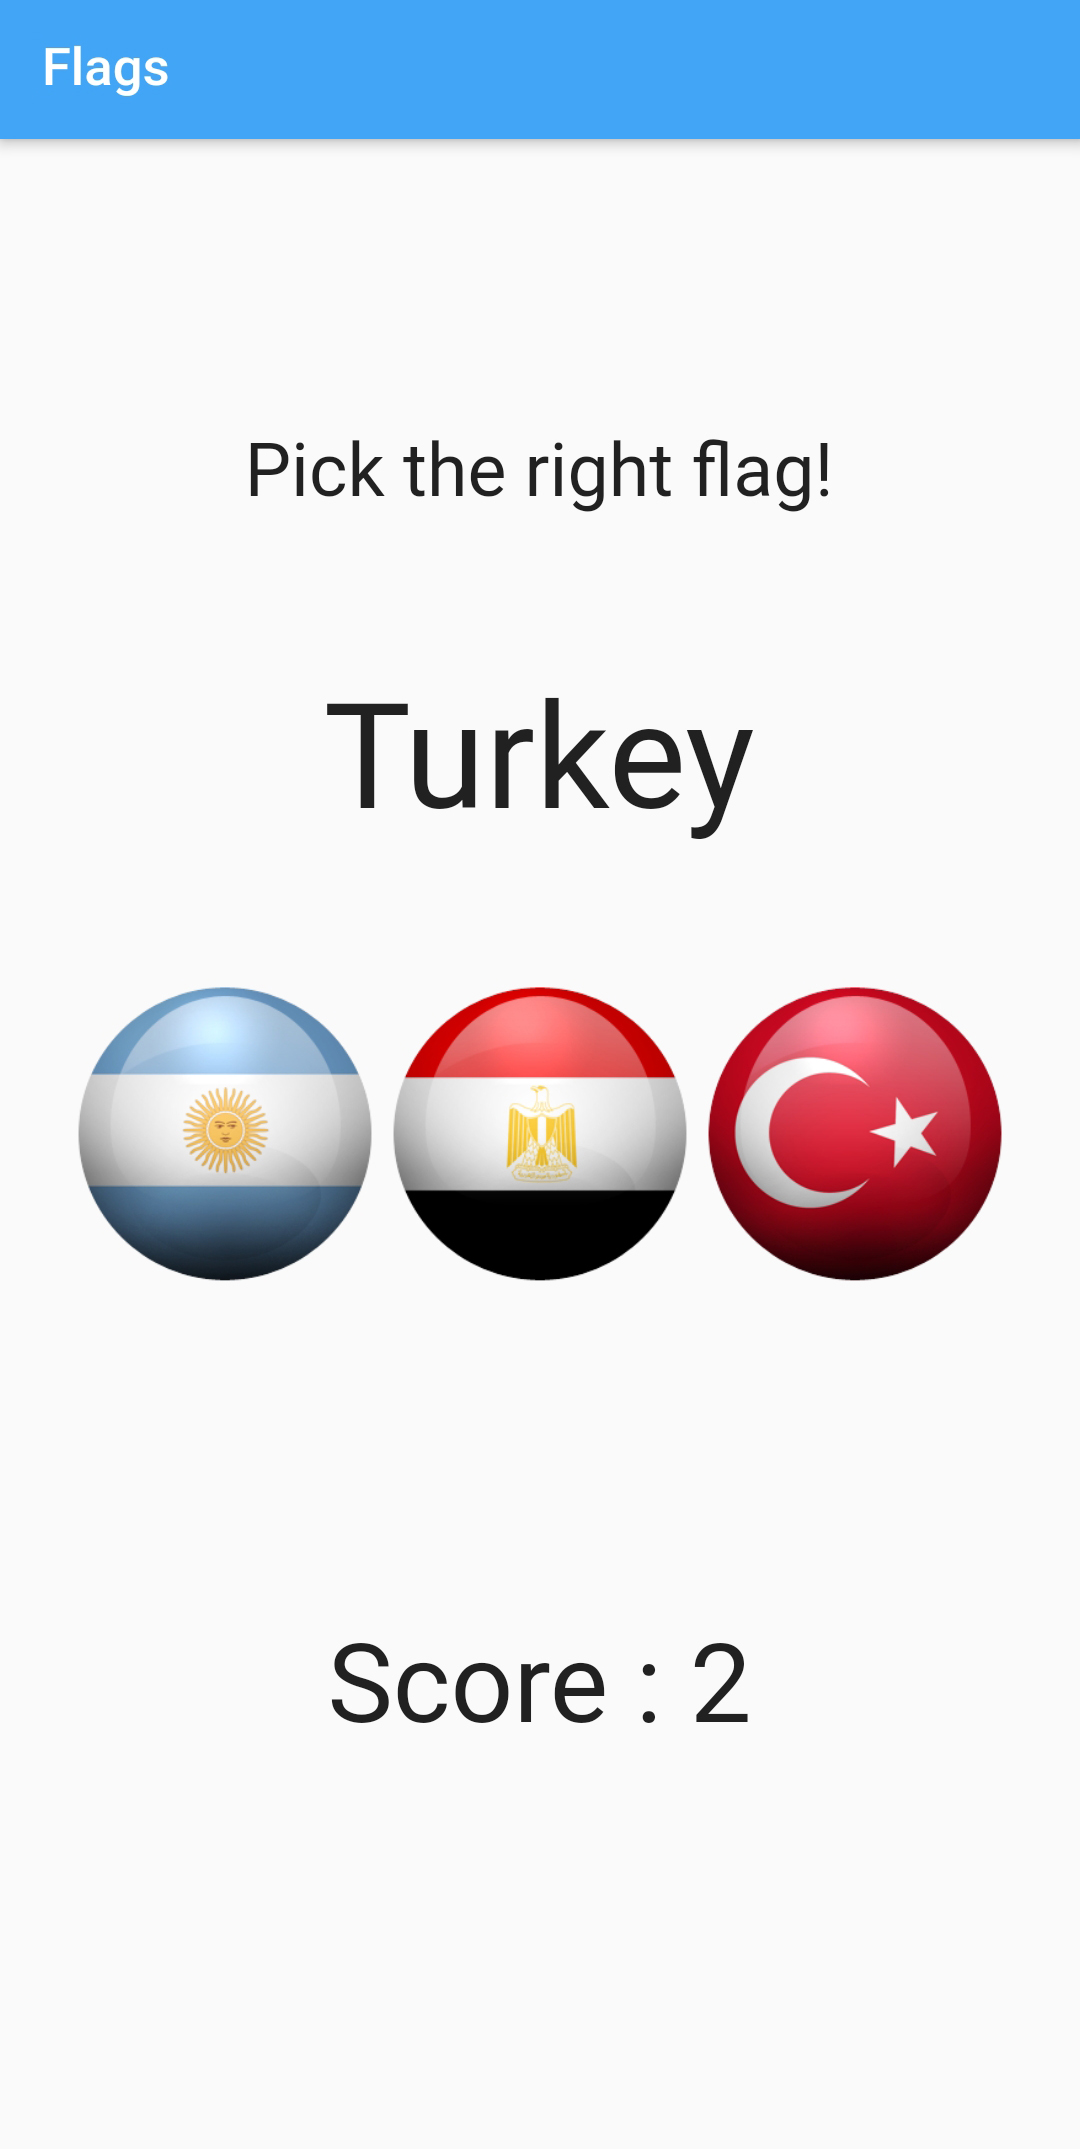
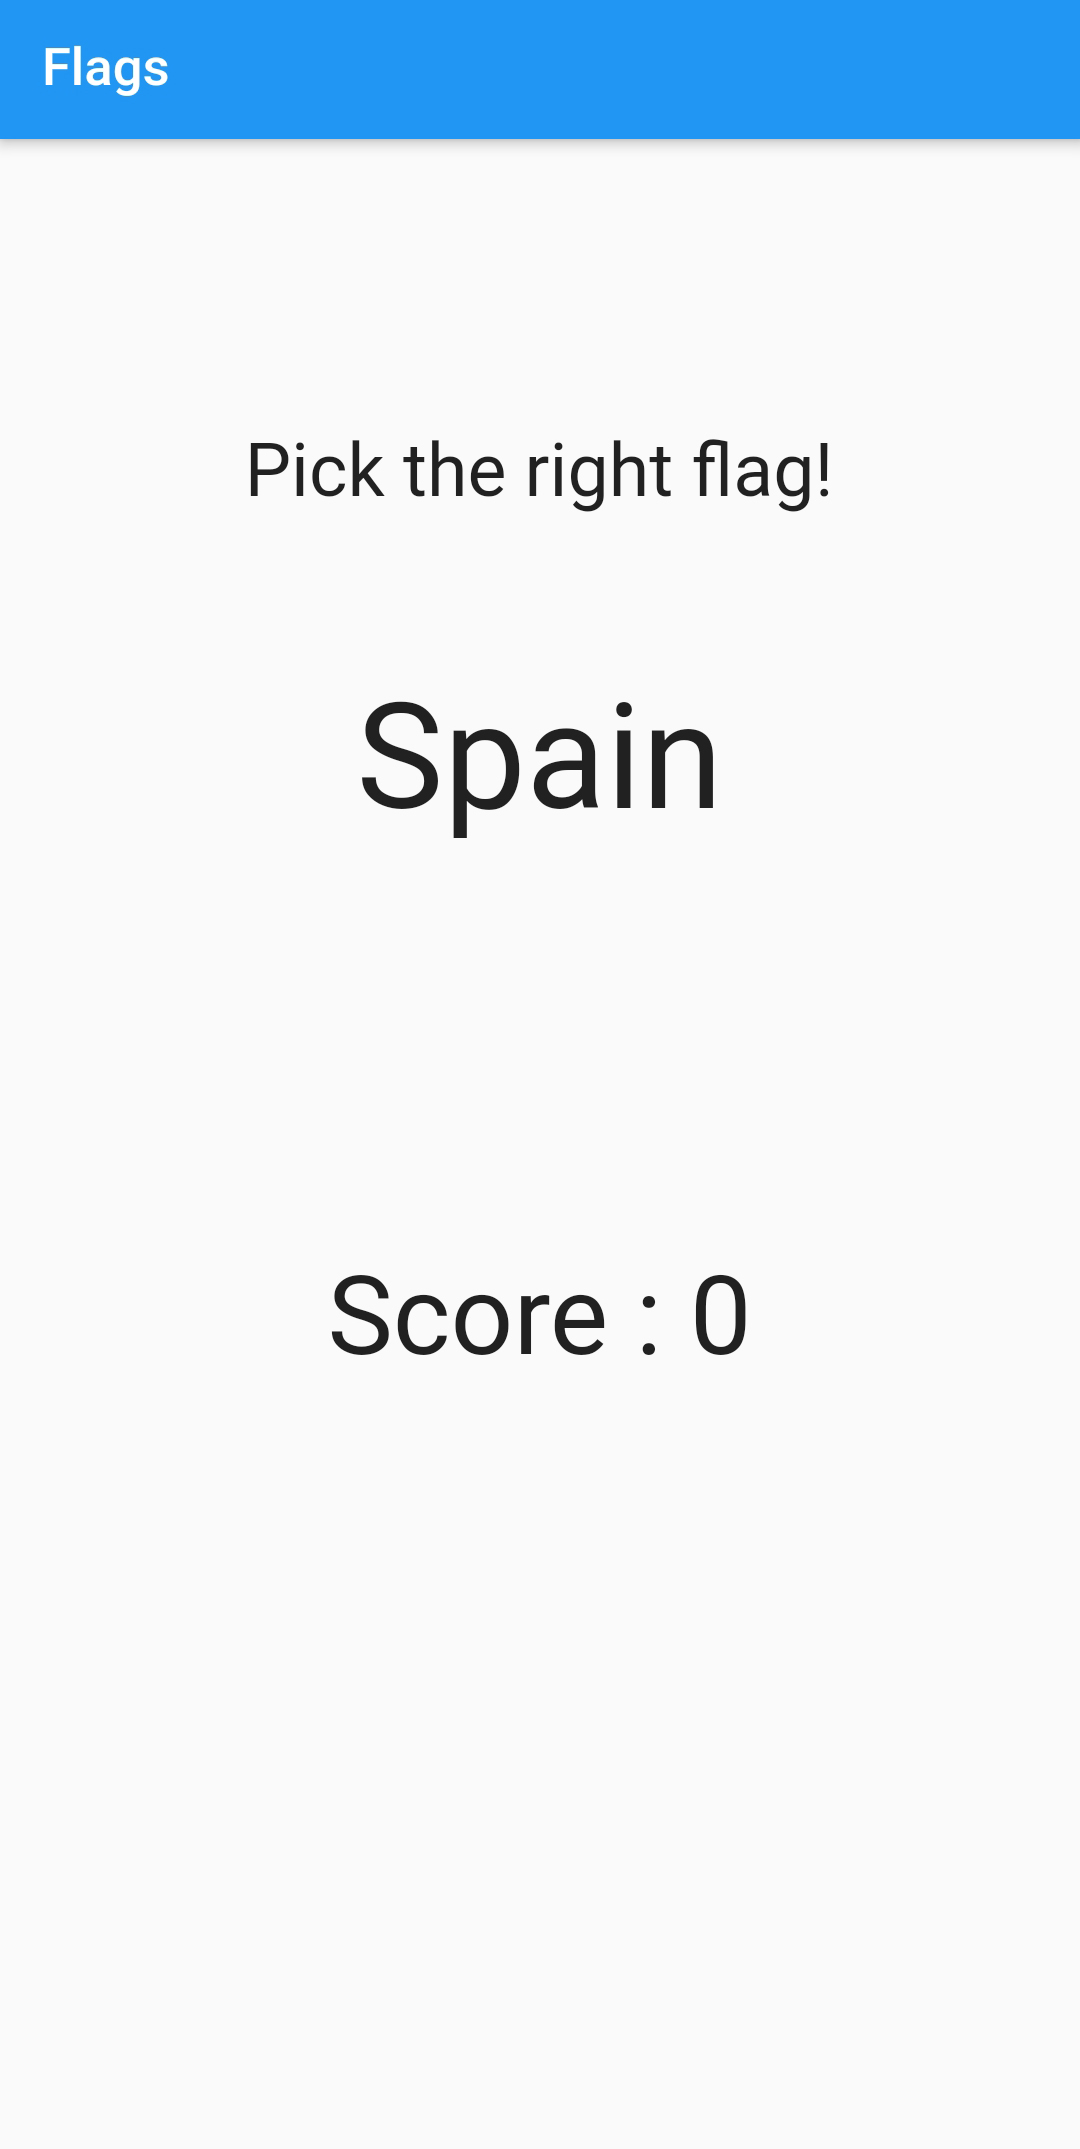
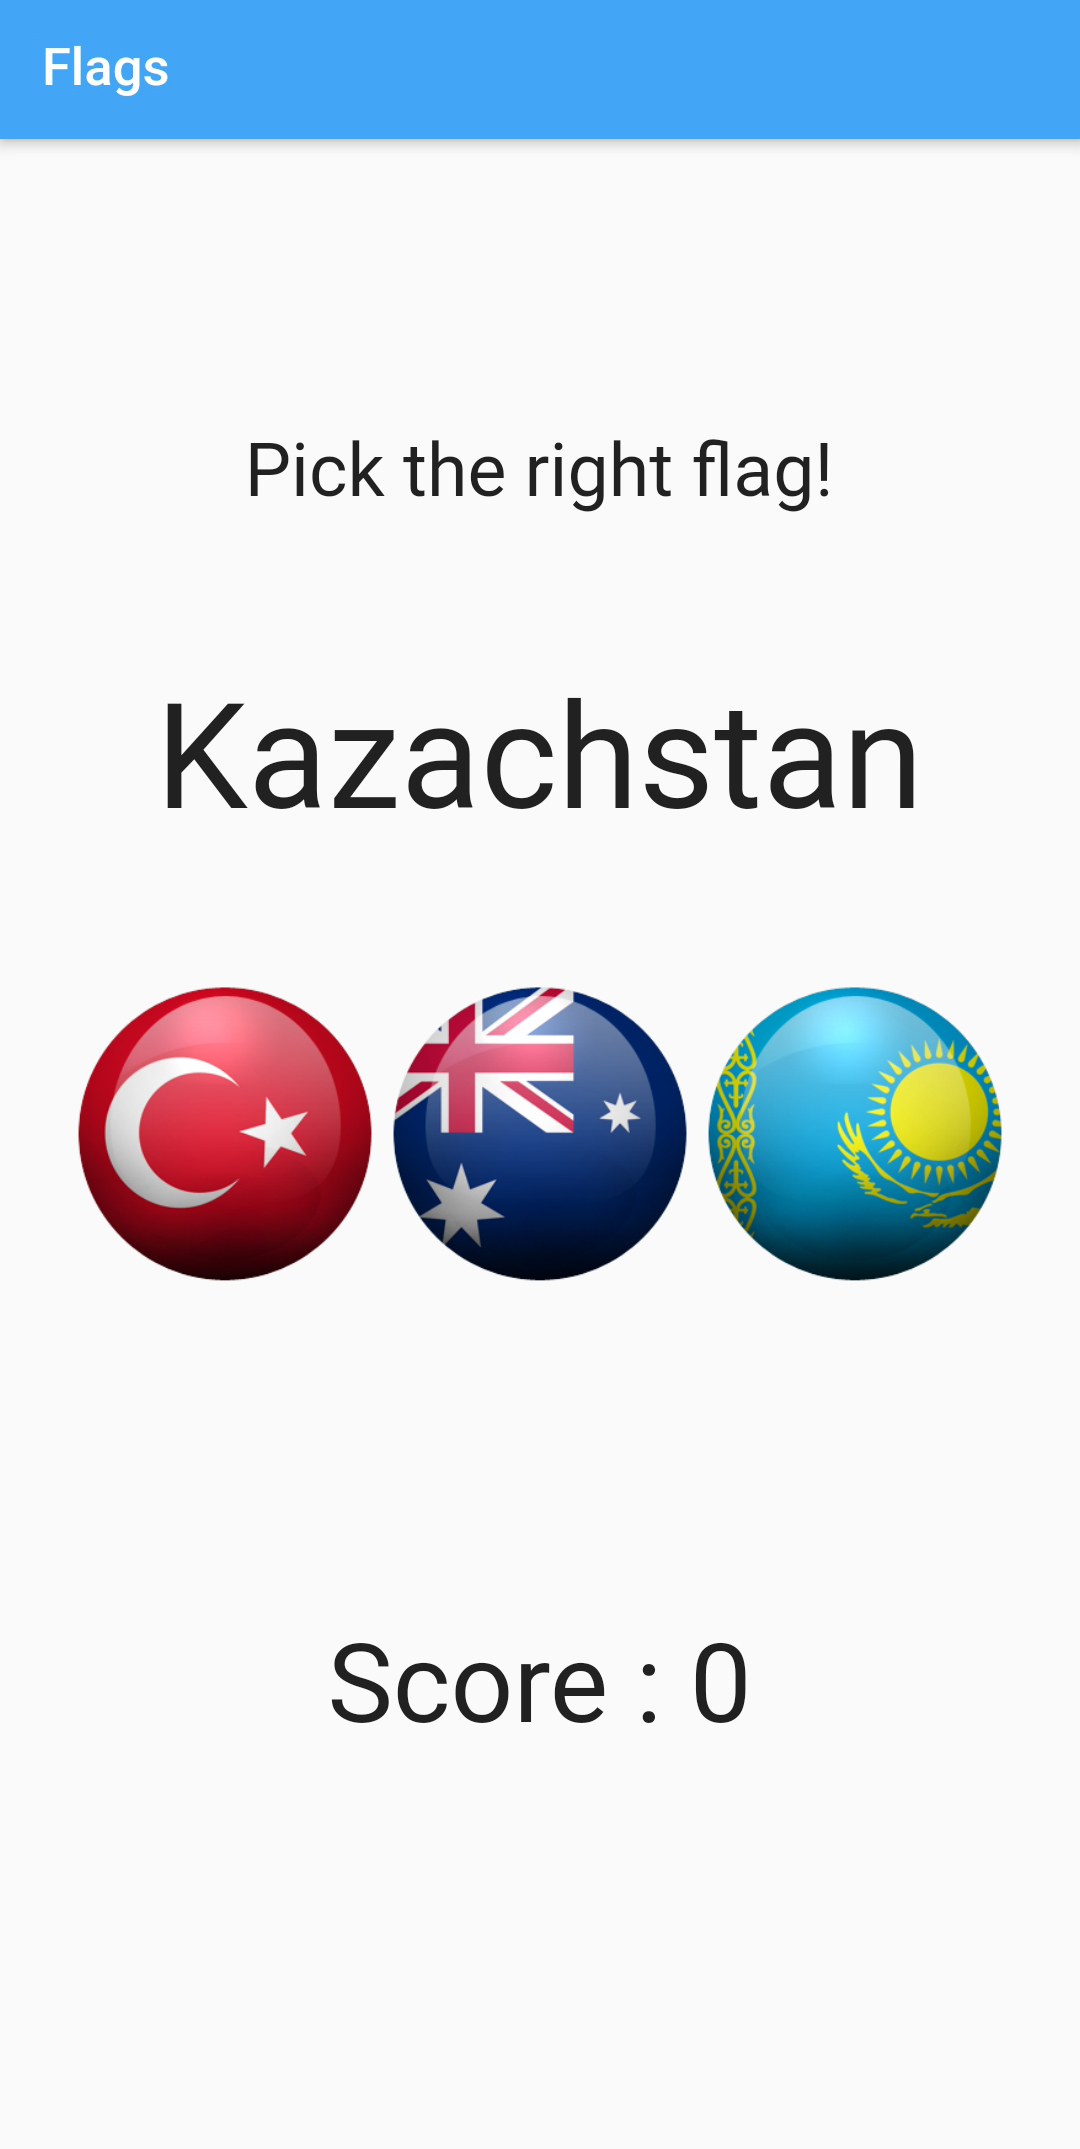
# Exercise 2 - Flags
- In this exercise you will develop an app with which you can test your flag knowledge. The app looks like this
# Create the Flags app
- Create a new flutter application with name
flags - Create the following directories in the
libfolder to organize your code:models,pagesandwidgets - Delete
widget_test.dartin thetestfolder - In
main.dartopen aMaterialAppwith the right colors. The name of the app isFlagsApp. Remove that uggly debug banner. In the home property call the page widget for the default route of the app:QuizPage
# Design the UI of the QuizPage
- Create a new file
quiz.dartin thepagesfolder - Create
QuizPage, a stateful widget. Design the UI of the page. For now, don't include the row with the three flags. Later in the exercise we will create a separate widget for the flag and use the widget. - Your app looks like this (Spain and score hardcoded)
# Load the Assets
- Create a folder
assetsin the root of your application and copy the png's into it. - Download flags
- Next open
pubspec.yamland add the assets to your application
  assets:
    - assets/ar.png
    - assets/au.png
    - assets/br.png
    - assets/ca.png
    - assets/ch.png
    - assets/ci.png
    - assets/cm.png
    - assets/cy.png
    - assets/eg.png
    - assets/es.png
    - assets/gh.png
    - assets/gr.png
    - assets/jm.png
    - assets/jp.png
    - assets/kz.png
    - assets/mt.png
    - assets/mx.png
    - assets/pt.png
    - assets/sy.png
    - assets/tr.png
2
3
4
5
6
7
8
9
10
11
12
13
14
15
16
17
18
19
20
21
# Country class
- Create a new file
country.dartin themodelsfolder - Next create a
Countryclass with these properties:flagandname - In the
QuizPage, create an array with all countries
  List<Country> _countries = [
    Country('ar', 'Argentina'),
    Country('br', 'Brazil'),
    Country('ca', 'Canada'),
    Country('es', 'Spain'),
    Country('mx', 'Mexico'),
    Country('pt', 'Portugal'),
    Country('tr', 'Turkey'),
    Country('gr', 'Greece'),
    Country('eg', 'Egypt'),
    Country('au', 'Australia'),
    Country('ci', 'Côte d\'Ivoire'),
    Country('cm', 'Cameroon'),
    Country('cy', 'Cyprus'),
    Country('gh', 'Ghana'),
    Country('jm', 'Jamaica'),
    Country('jp', 'Japan'),
    Country('kz', 'Kazachstan'),
    Country('mt', 'Malta'),
    Country('sy', 'Syria'),
    Country('ch', 'Switzerland')
  ];
2
3
4
5
6
7
8
9
10
11
12
13
14
15
16
17
18
19
20
21
22
# FlagImage Widget
- In the folder
widgetscreate a new fileflagimage.dart - Create a custom widget
FlagImageWidgetwith two properties: the name of the flag and a callback function when the flag is tapped. This callback function has one parameter: the name of flag that has been tapped.
TIP
You will need a GestureDetector with an onTap method.
- Now modify the UI, add a
Rowwith threeFlageImageWidgetwidgets with the - for now - hardcoded countries Argentina, Egypt and Turkey.

# Random Flags
- When you start the game, show three random flags. To do this, shuffle the array with the countries and take the first three countries.
- You can use this shuffle function
  List shuffle(List items) {
    var random = new Random();

    // Go through all elements.
    for (var i = items.length - 1; i > 0; i--) {
      // Pick a pseudorandom number according to the list length
      var n = random.nextInt(i + 1);
      // Shuffle
      var temp = items[i];
      items[i] = items[n];
      items[n] = temp;
    }

    return items;
  }
2
3
4
5
6
7
8
9
10
11
12
13
14
15
- Choose at random one of those three as the flag you need to find and show the name of the country to the user.
- When the user taps a flag, check if the answer is correct. If so, add one to the score and show the next three random flags